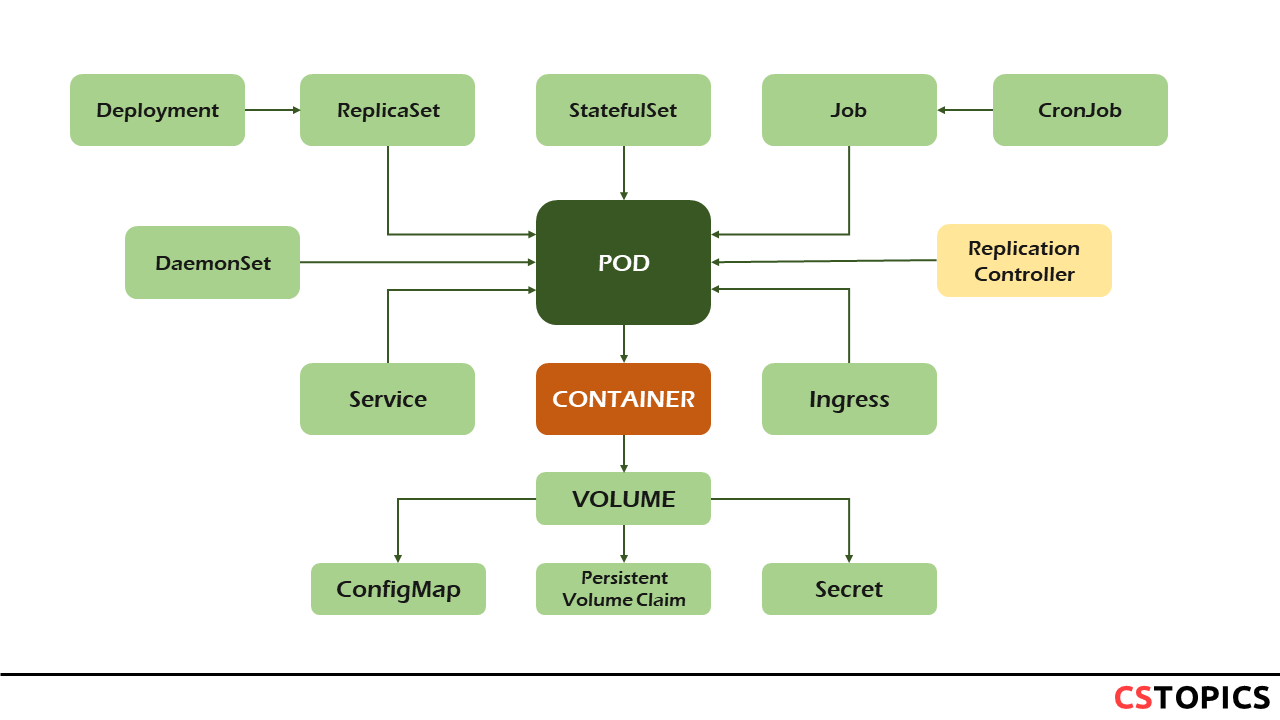
Workloads
Introduction
A workload is an application running on Kubernetes. Whether your workload is a single component or several that work together, on Kubernetes you run it inside a set of Pods. In Kubernetes, a Pod represents a set of running containers on your cluster.
A Pod has a defined lifecycle. For example, once a Pod is running in your cluster then a critical failure on the node where that Pod is running means that all the Pods on that node fail. Kubernetes treats that level of failure as final: you would need to create a new Pod even if the node later recovers.
However, to make life considerably easier, you don't need to manage each Pod directly. Instead, you can use workload resources that manage a set of Pods on your behalf. These resources configure controllers that make sure the right number of the right kind of Pod are running, to match the state you specified.
Those workload resources include:
- Deployment and ReplicaSet (replacing the legacy resource ReplicationController)
- StatefulSet
- DaemonSet for running Pods that provide node-local facilities, such as a storage driver or network plugin
- Job and CronJob for tasks that run to completion
ReplicationController
A ReplicationController ensures that a specified number of pod replicas are running at any one time. In other words, a ReplicationController makes sure that a pod or a homogeneous set of pods is always up and available.
A Deployment that configures a ReplicaSet is now the recommended way to set up replication.
If there are too many pods, the ReplicationController terminates the extra pods. If there are too few, the ReplicationController starts more pods. Unlike manually created pods, the pods maintained by a ReplicationController are automatically replaced if they fail, are deleted, or are terminated.
This example ReplicationController config runs three copies of the nginx web server.
apiVersion: v1
kind: ReplicationController
metadata:
  name: nginx
spec:
  replicas: 3
  selector:
    app: nginx
  template:
    metadata:
      name: nginx
      labels:
        app: nginx
    spec:
      containers:
      - name: nginx
        image: nginx
        ports:
        - containerPort: 80
ReplicaSet
A ReplicaSet's purpose is to maintain a stable set of replica Pods running at any given time. As such, it is often used to guarantee the availability of a specified number of identical Pods.
A ReplicaSet is defined with fields, including a selector that specifies how to identify Pods it can acquire, a number of replicas indicating how many Pods it should be maintaining, and a pod template specifying the data of new Pods it should create to meet the number of replicas criteria. A ReplicaSet then fulfills its purpose by creating and deleting Pods as needed to reach the desired number. When a ReplicaSet needs to create new Pods, it uses its Pod template.
The only difference between ReplicationController and ReplicaSet is in the usage of selectors to replicate pods. Replica Set use Set-Based selectors while replication controllers use Equity-Based selectors.
This example ReplicaSet runs three copies of the php-redis pod.
apiVersion: apps/v1
kind: ReplicaSet
metadata:
  name: frontend
  labels:
    app: guestbook
    tier: frontend
spec:
  # modify replicas according to your case
  replicas: 3
  selector:
    matchLabels:
      tier: frontend
  template:
    metadata:
      labels:
        tier: frontend
    spec:
      containers:
      - name: php-redis
        image: gcr.io/google_samples/gb-frontend:v3
Deployment
A Deployment provides declarative updates for Pods and ReplicaSets.
You describe a desired state in a Deployment, and the Deployment Controller changes the actual state to the desired state at a controlled rate. You can define Deployments to create new ReplicaSets, or to remove existing Deployments and adopt all their resources with new Deployments.
Do not manage ReplicaSets owned by a Deployment. Consider opening an issue in the main Kubernetes repository if your use case is not covered below.
Use Cases
The following are typical use cases for Deployments:
- Create a Deployment to rollout a ReplicaSet. The ReplicaSet creates Pods in the background. Check the status of the rollout to see if it succeeds or not.
- Declare the new state of the Pods by updating the PodTemplateSpec of the Deployment. A new ReplicaSet is created and the Deployment manages moving the Pods from the old ReplicaSet to the new one at a controlled rate. Each new ReplicaSet updates the revision of the Deployment.
- Rollback to an earlier Deployment revision if the current state of the Deployment is not stable. Each rollback updates the revision of the Deployment.
- Scale up the Deployment to facilitate more load.
- Pause the Deployment to apply multiple fixes to its PodTemplateSpec and then resume it to start a new rollout.
- Use the status of the Deployment as an indicator that a rollout has stuck.
- Clean up older ReplicaSets that you don't need anymore
The following is an example of a Deployment. It creates a ReplicaSet to bring up three nginx Pods:
apiVersion: apps/v1
kind: Deployment
metadata:
  name: nginx-deployment
  labels:
    app: nginx
spec:
  replicas: 3
  selector:
    matchLabels:
      app: nginx
  template:
    metadata:
      labels:
        app: nginx
    spec:
      containers:
      - name: nginx
        image: nginx:1.14.2
        ports:
        - containerPort: 80
In this example:
- A Deployment named nginx-deployment is created, indicated by the .metadata.name field.
- The Deployment creates three replicated Pods, indicated by the .spec.replicas field.
- The .spec.selector field defines how the Deployment finds which Pods to manage. In this case, you simply select a label that is defined in the Pod template (app: nginx). However, more sophisticated selection rules are possible, as long as the Pod template itself satisfies the rule.
- The template field contains the following sub-fields:
- The Pods are labeled app: nginxusing the .metadata.labels field.
- The Pod template's specification, or .template.spec field, indicates that the Pods run one container, nginx, which runs the nginx Docker Hub image at version 1.14.2.
- Create one container and name it nginx using the .spec.template.spec.containers[0].name field.
Updating
A Deployment’s rollout is triggered if and only if the Deployment’s Pod template (that is, .spec.template) is changed, for example if the labels or container images of the template are updated. Other updates, such as scaling the Deployment, do not trigger a rollout.
Example
update the nodejs-app Pods to use the hellojs:2.0.0 image instead of the hellojs:1.0.0 image.
$ kubectl --record deployment.apps/nodejs-app set image nodejs=hellojs:2.0.0
  deployment.apps/nodejs-app image updated

$ kubectl rollout status deployment.apps/nodejs-app
  Waiting for deployment "nodejs-app" rollout to finish: 2 out of 3 new replicas have been updated...
  Waiting for deployment "nodejs-app" rollout to finish: 1 old replicas are pending termination...
  deployment "nodejs-app" successfully rolled out
Sometimes, you may want to rollback a Deployment; for example, when the Deployment is not stable, such as crash looping.
Example: typo 1.0.1
$ kubectl --record deployment.apps/nodejs-app set image nodejs=hellojs:1.0.1

$ kubectl get rs
  NAME                    DESIRED  CURRENT   READY     AGE
  nodejs-app-78fbc49f85   3        3         3         28m
  nodejs-app-7fbd5bcc78   0        0         0         22m
  nodejs-app-97fc9fcf6    1        1         0         23s

$ kubectl rollout history deployment.apps/nodejs-app
  REVISION    CHANGE-CAUSE
  3           kubectl.exe deployment.apps/nodejs-app set image nodejs=hellojs:1.0.0 --record=true
  4           kubectl.exe deployment.apps/nodejs-app set image nodejs=hellojs:1.0.1 --record=true

$ kubectl rollout undo deployment.apps/nodejs-app
  deployment.apps/nodejs-app rolled back

$ kubectl get deployment.apps/nodejs-app
  NAME        READY  UP-TO-DATE  AVAILABLE AGE
  nodejs-app  3/3    3           3         30m
Scaling
You can scale a Deployment by using the following command:
$ kubectl scale deployment.apps/nodejs-app --replicas=5
  deployment.apps/nodejs-app scaled

$ kubectl get pods
NAME                          READY   STATUS   RESTARTS  AGE
nodejs-app-78fbc49f85-6v8kw   1/1     Running  0         49s
nodejs-app-78fbc49f85-7dbwt   1/1     Running  0         48s
nodejs-app-78fbc49f85-7hq9k   1/1     Running  0         25m
nodejs-app-78fbc49f85-8cdzt   1/1     Running  0         25m
nodejs-app-78fbc49f85-t89rm   1/1     Running  0         35m

$ kubectl get rs
NAME                   DESIRED   CURRENT   READY  AGE
nodejs-app-78fbc49f85  5            5       5     40m
Failed Deployment
Your Deployment may get stuck trying to deploy its newest ReplicaSet without ever completing. This can occur due to some of the following factors:
- Insufficient quota
- Readiness probe failures
- Image pull errors
- Insufficient permissions
- Limit ranges
- Application runtime misconfiguration
One way you can detect this condition is to specify a deadline parameter in your Deployment spec: (.spec.progressDeadlineSeconds). .spec.progressDeadlineSeconds denotes the number of seconds the Deployment controller waits before indicating (in the Deployment status) that the Deployment progress has stalled.
The following kubectl command sets the spec with progressDeadlineSeconds to make the controller report lack of progress for a Deployment after 10 minutes:
$ kubectl patch deployment.v1.apps/nginx-deployment -p '{"spec":{"progressDeadlineSeconds":600}}'
   deployment.apps/nginx-deployment patched
StatefulSet
StatefulSet is the workload API object used to manage stateful applications.
Manages the deployment and scaling of a set of Pods, and provides guarantees about the ordering and uniqueness of these Pods.
Like a Deployment, a StatefulSet manages Pods that are based on an identical container spec. Unlike a Deployment, a StatefulSet maintains a sticky identity for each of their Pods. These pods are created from the same spec, but are not interchangeable: each has a persistent identifier that it maintains across any rescheduling.
If you want to use storage volumes to provide persistence for your workload, you can use a StatefulSet as part of the solution. Although individual Pods in a StatefulSet are susceptible to failure, the persistent Pod identifiers make it easier to match existing volumes to the new Pods that replace any that have failed. Using StatefulSets
StatefulSets are valuable for applications that require one or more of the following.
- Stable, unique network identifiers.
- Stable, persistent storage.
- Ordered, graceful deployment and scaling.
- Ordered, automated rolling updates.
In the above, stable is synonymous with persistence across Pod (re)scheduling. If an application doesn't require any stable identifiers or ordered deployment, deletion, or scaling, you should deploy your application using a workload object that provides a set of stateless replicas. Deployment or ReplicaSet may be better suited to your stateless needs.
The example below demonstrates the definition of a StatefulSet.
apiVersion: v1
kind: Service
metadata:
  name: nginx
  labels:
    app: nginx
spec:
  ports:
  - port: 80
    name: web
  clusterIP: None
  selector:
    app: nginx
---
apiVersion: apps/v1
kind: StatefulSet
metadata:
  name: web
spec:
  selector:
    matchLabels:
      app: nginx # has to match .spec.template.metadata.labels
  serviceName: "nginx"
  replicas: 3 # by default is 1
  template:
    metadata:
      labels:
        app: nginx # has to match .spec.selector.matchLabels
    spec:
      terminationGracePeriodSeconds: 10
      containers:
      - name: nginx
        image: k8s.gcr.io/nginx-slim:0.8
DaemonSet
A DaemonSet ensures that all (or some) Nodes run a copy of a Pod. As nodes are added to the cluster, Pods are added to them. As nodes are removed from the cluster, those Pods are garbage collected. Deleting a DaemonSet will clean up the Pods it created.
Some typical uses of a DaemonSet are:
- running a cluster storage daemon on every node
- running a logs collection daemon on every node
- running a node monitoring daemon on every node
In a simple case, one DaemonSet, covering all nodes, would be used for each type of daemon. A more complex setup might use multiple DaemonSets for a single type of daemon, but with different flags and/or different memory and cpu requests for different hardware types.
The example below demonstrates the definition of a DaemonSet.
apiVersion: apps/v1
kind: DaemonSet
metadata:
  name: fluentd-elasticsearch
  namespace: kube-system
  labels:
    k8s-app: fluentd-logging
spec:
  selector:
    matchLabels:
      name: fluentd-elasticsearch
  template:
    metadata:
      labels:
        name: fluentd-elasticsearch
    spec:
      tolerations:
      # this toleration is to have the daemonset runnable on master nodes
      # remove it if your masters can't run pods
      - key: node-role.kubernetes.io/master
        effect: NoSchedule
      containers:
      - name: fluentd-elasticsearch
        image: quay.io/fluentd_elasticsearch/fluentd:v2.5.2
Jobs
A Job creates one or more Pods and ensures that a specified number of them successfully terminate. As pods successfully complete, the Job tracks the successful completions. When a specified number of successful completions is reached, the task (ie, Job) is complete. Deleting a Job will clean up the Pods it created.
A simple case is to create one Job object in order to reliably run one Pod to completion. The Job object will start a new Pod if the first Pod fails or is deleted (for example due to a node hardware failure or a node reboot).
You can also use a Job to run multiple Pods in parallel.
Here is an example Job config. It computes π to 2000 places and prints it out. It takes around 10s to complete.
apiVersion: batch/v1
kind: Job
metadata:
  name: pi
spec:
  template:
    spec:
      containers:
      - name: pi
        image: perl
        command: ["perl",  "-Mbignum=bpi", "-wle", "print bpi(2000)"]
      restartPolicy: Never
  backoffLimit: 4
backoffLimit is to specify the number of retries before considering a Job as failed.
If Job fails and the restartPolicy = OnFailure, then the Pod stays on the node, but the container is re-run. Else specify restartPolicy = Never to continue according to the lifecycle of Pod.
CronJob
A CronJob creates Jobs on a repeating schedule.
One CronJob object is like one line of a crontab (cron table) file. It runs a job periodically on a given schedule, written in Cron format.
All CronJob schedule: times are based on the timezone of the kube-controller-manager.
CronJobs are useful for creating periodic and recurring tasks, like running backups or sending emails. CronJobs can also schedule individual tasks for a specific time, such as scheduling a Job for when your cluster is likely to be idle.
A cron job creates a job object about once per execution time of its schedule. Here, "about" means that there are certain circumstances where two jobs might be created, or no job might be created. Kubernetes attempts to make these rare, but cannot completely prevent them. Therefore, jobs should be idempotent.
This example CronJob manifest prints the current time and a hello message every minute:
apiVersion: batch/v1beta1
kind: CronJob
metadata:
  name: hello
spec:
  schedule: "*/1 * * * *"
  jobTemplate:
    spec:
      template:
        spec:
          containers:
          - name: hello
            image: busybox
            imagePullPolicy: IfNotPresent
            args:
            - /bin/sh
            - -c
            - date; echo Hello from the Kubernetes cluster
          restartPolicy: OnFailure
Execise
Create a deployment using "nodejs-deployment.yaml"
apiVersion: apps/v1
kind: Deployment
metadata:
  name: nodejs-app
  labels:
    run: nodejs-app
spec:
  replicas: 3
  selector:
    matchLabels:
      run: nodejs-app
  template:
    metadata:
      labels:
        run: nodejs-app
    spec:
      containers:
      - name: nodejs
        image: hellojs
        imagePullPolicy: IfNotPresent
        ports:
          - containerPort: 8080
Create a service using "nodejs-svc.yaml"
apiVersion: v1
kind: Service
metadata:
  name: nodejs-svc
spec:
  selector:
    run: nodejs-app
  ports:
    - protocol: TCP
      port: 8080
      targetPort: 8080
$ kubectl apply -f  nodejs-deployment.yaml
$ kubectl apply -f  nodejs-svc.yaml

$ kubectl get all
NAME                              READY   STATUS    RESTARTS   AGE
pod/nodejs-app-7bdb96c8db-5hl4w 1/1     Running   0          5m19s
pod/nodejs-app-7bdb96c8db-gxng6 1/1     Running   0          5m19s
pod/nodejs-app-7bdb96c8db-qrfq6 1/1     Running   0          5m19s

NAME                 TYPE        CLUSTER-IP       EXTERNAL-IP   PORT(S)    AGE
service/kubernetes  ClusterIP   10.96.0.1        <none>        443/TCP    7d
service/nodejs-svc  ClusterIP   10.108.104.238   <none>        8080/TCP   4s

NAME                         READY   UP-TO-DATE   AVAILABLE   AGE
deployment.apps/nodejs-app   3/3     3            3           5m20s

NAME                                    DESIRED   CURRENT   READY   AGE
replicaset.apps/nodejs-app-7bdb96c8db   …

NAME         TYPE        CLUSTER-IP      EXTERNAL-IP   PORT(S)    AGE
Kubernetes  ClusterIP   10.96.0.1       <none>        443/TCP    7h25m
nodejs-svc  ClusterIP   10.107.19.196   <none>        8080/TCP   25m

 $ kubectl proxy
    http://localhost:8001/api/v1/namespaces/default/services/nodejs-svc/proxy/