Persisting Data
Union File Systems
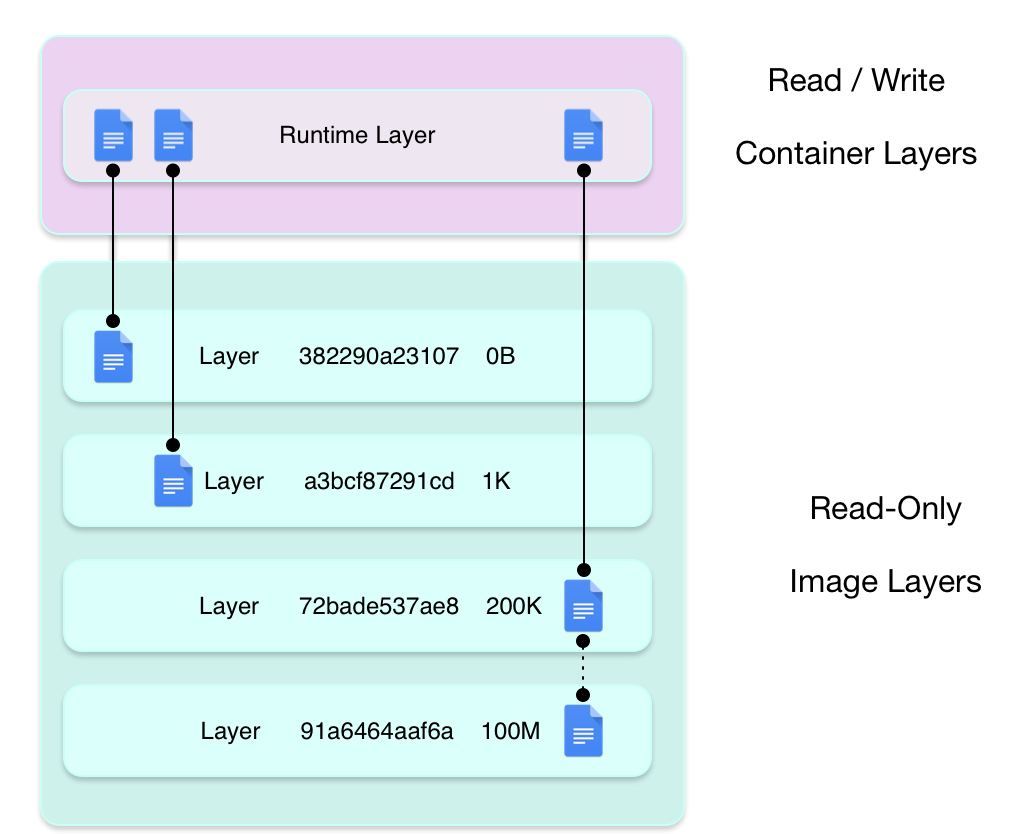
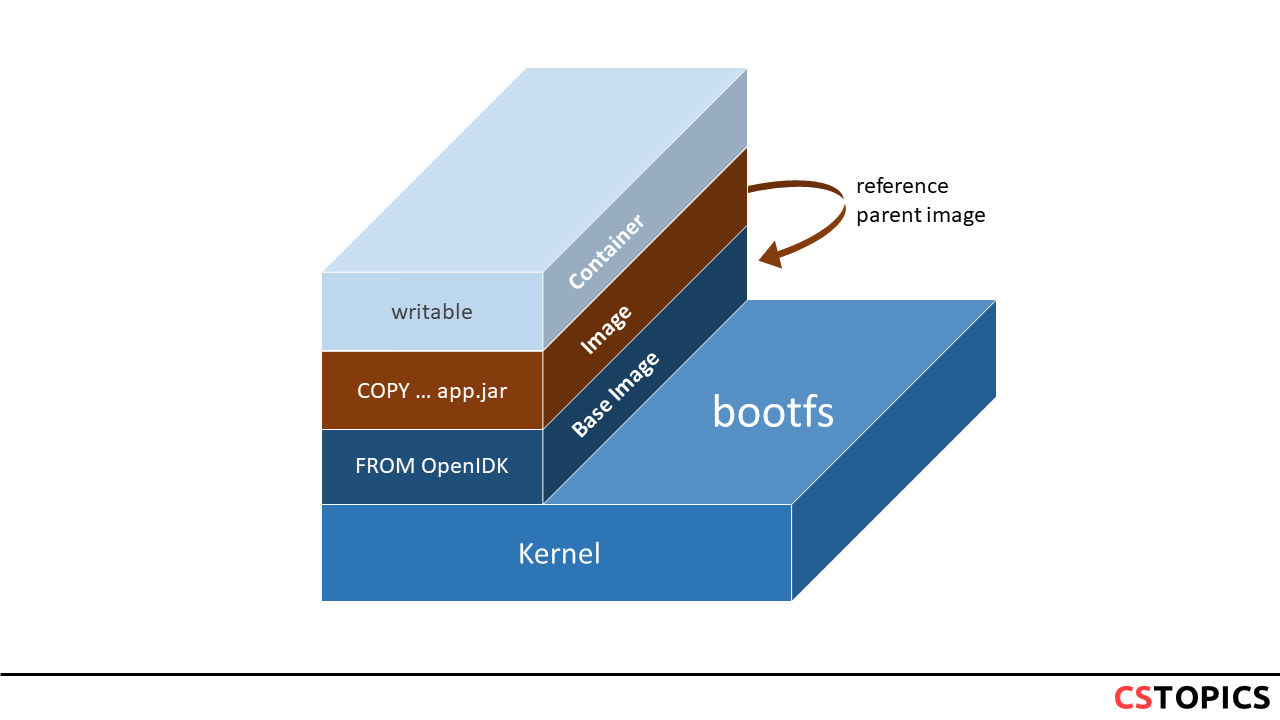
Union file systems, or UnionFS, are file systems that operate by creating layers, making them very lightweight and fast.
Docker Engine uses UnionFS to provide the building blocks for containers. Docker Engine can use multiple UnionFS variants, including AUFS, btrfs, vfs, and DeviceMapper.
It allows files and directories of separate file systems, known as branches, to be transparently overlaid, forming a single coherent file system.
 |
|---|
| Source: Docker Docs |
Persisting Data
When a Docker container is deleted, relaunching the image will start a fresh container without any of the changes made in the previously running container -- those changes are lost. Docker calls this combination of read-only layers with a read-write layer on top a Union File System.
In order to be able to save (persist) data and also to share data between containers, Docker came up with the concept of volumes.
volumes are directories (or files) that are outside of the default Union File System and exist as normal directories and files on the host filesystem.
A volume allows data to be retained even if a container is deleted. Volumes are also a convenient way to exchange data between the host and the container.
Mounting the volume is a good solution to do the following:
- Transfer data to a container
- Save data from a container
- Exchange data between containers
Docker volumes exist outside the Union File System with its read-only and writable layer. The volume is a folder shared between the container and the host computer. Volumes can also be shared between containers.

Mount Type
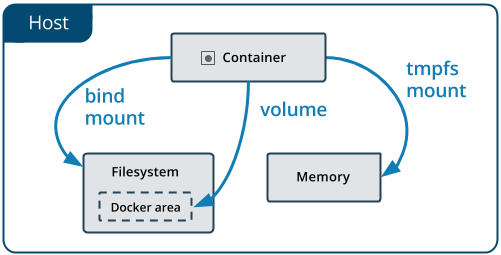
Docker has two options for containers to store files in the host machine, so that the files are persisted even after the container stops: volumes, and bind mounts. If you’re running Docker on Linux you can also use a tmpfs mount. If you’re running Docker on Windows you can also use a named pipe.
 |
|---|
| Source: Docker Docs |
No matter which type of mount you choose to use, the data looks the same from within the container. It is exposed as either a directory or an individual file in the container’s filesystem.
- Volumes are stored in a part of the host filesystem which is managed by Docker (/var/lib/docker/volumes/ on Linux). Non-Docker processes should not modify this part of the filesystem. Volumes are the best way to persist data in Docker.
- Bind mounts may be stored anywhere on the host system. They may even be important system files or directories. Non-Docker processes on the Docker host or a Docker container can modify them at any time.
- tmpfs mounts: A tmpfs mount is not persisted on disk, either on the Docker host or within a container. It can be used by a container during the lifetime of the container, to store non-persistent state or sensitive information. For instance, internally, swarm services use tmpfs mounts to mount secrets into a service’s containers.
- named pipes: An npipe mount can be used for communication between the Docker host and a container. Common use case is to run a third-party tool inside of a container and connect to the Docker Engine API using a named pipe.
Use Volumes
Volumes are the preferred mechanism for persisting data generated by and used by Docker containers. While bind mounts are dependent on the directory structure of the host machine, volumes are completely managed by Docker. Volumes have several advantages over bind mounts:
- Volumes are easier to back up or migrate than bind mounts.
- You can manage volumes using Docker CLI commands or the Docker API.
- Volumes work on both Linux and Windows containers.
- Volumes can be more safely shared among multiple containers.
- Volume drivers let you store volumes on remote hosts or cloud providers, to encrypt the contents of volumes, or to add other functionality.
- New volumes can have their content pre-populated by a container.
In addition, volumes are often a better choice than persisting data in a container’s writable layer, because a volume does not increase the size of the containers using it, and the volume’s contents exist outside the lifecycle of a given container.
Docker Volumes Basics
A Docker volume "lives" outside the container on the host computer.
From within the Container, the volume behaves like a folder where you store data and from which you can retrieve data. It is a mount point to a directory on the host computer.
There are several ways to create and manage Docker volumes. Each method has its own advantages and disadvantages. Using the Docker volume create command
- Advantage: Quick and easy
- Disadvantage: The volume on the host is created automatically by Docker and can be hard to find and use
Starting with version 1.9.0, Docker volumes can now be created and managed with the docker volume command.
Create and name volume
The docker volume create command creates a named volume. The name allows you to easily find Docker volumes and assign them to containers.
To create a volume, use the command:
### Use Volume in Container
To start a container that uses a volume you created with docker volume create, add the following argument to the docker run command:
For example, to execute a container from the centos image named my-volume-test and assign the volume data volume to the /data directory of the container, the command is:
List Volumes
To list all Docker volumes on the system, use the command
This returns a list of all Docker volumes created on the host.
Inspect Volume
To inspect a named volume, use the command
This returns information about the volume, including the mount point, the directory on the host system through which the volume can be accessed.
For example, to get more information about the volume named data-volume that we created above, the command is:
Remove Volume
To remove a named volume, use the command
Note: You cannot remove a volume if it is used by an existing container. Before you remove the volume, you must stop and delete the container using the followingstop and rm commands:
For example, to delete the volume data-volume, you must first stop and remove the my-volume-test container that uses it:
To delete all volumes not in use, try:
Sharing Data
To give another container access to a container's volumes, we can provide the --volumes-from argument to docker run. For example:
docker run -it --name vol-test -v /data debian /bin/bash
  root@CONTAINER:/# ls /data
  root@CONTAINER:/#

docker run -it --volumes-from vol-test debian /bin/bash
  root@NEWCONTAINER:/# ls /data
  test-file
  root@NEWCONTAINER:/#
Permissions and Ownership
You can set the permissions and ownership on a volume, or initialize the volume with some default data or configuration files.
A key point to be aware of here is that anything after the VOLUME instruction in a Dockerfile will not be able to make changes to that volume e.g:
Will not work as expected. We want the touch command to run in the image's file system but it is actually running in the volume of a temporary container. The following will work:FROM debian:wheezy
RUN useradd foo
RUN mkdir /data && touch /data/x
RUN chown -R foo:foo /data
VOLUME /data
Exercise
Build a container with the following Dockerfile:
FROM debian
RUN useradd foo
RUN mkdir /data && touch /data/x
RUN chown -R foo:foo /data
VOLUME /data
use the following commands to use the volume:
docker run -it --rm -h CONTAINER --name vol-test -v /data debian /bin/bash
    root@CONTAINER:/# ls /data
    root@CONTAINER:/#
    root@CONTAINER:/# touch /data/test-file
docker run -it -h NEWCONTAINER --volumes-from vol-test debian /bin/bash
    root@NEWCONTAINER:/# ls /data
    test-file
docker build -t vol-mount-image .
docker run --rm --name vol-mount -d vol-mount-image
docker run -it --volumes-from vol-mount debian /bin/bash