API
Introduction
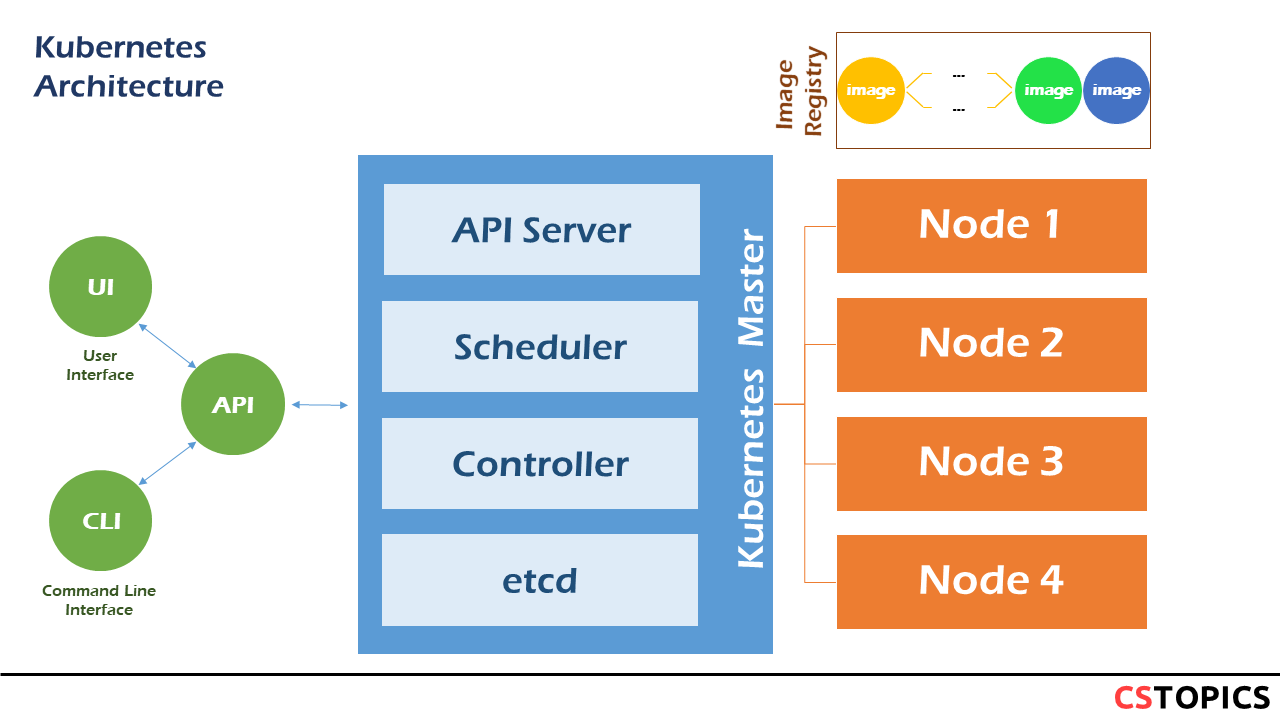
The core of Kubernetes' control plane is the API server. The API server exposes an HTTP API that lets end users, different parts of your cluster, and external components communicate with one another.
The REST API is the fundamental fabric of Kubernetes. All operations and communications between components, and external user commands are REST API calls that the API Server handles. Consequently, everything in the Kubernetes platform is treated as an API object and has a corresponding entry in the API.
The Kubernetes API lets you query and manipulate the state of objects in the Kubernetes API (for example: Pods, Namespaces, ConfigMaps, and Events).
Most operations can be performed through the kubectl command-line interface or other command-line tools, such as kubeadm, which in turn use the API. However, you can also access the API directly using REST calls.
Objects
Kubernetes objects are persistent entities in the Kubernetes system. Kubernetes uses these entities to represent the state of your cluster. Specifically, they can describe:
- What containerized applications are running (and on which nodes)
- The resources available to those applications
- The policies around how those applications behave, such as restart policies, upgrades, and fault-tolerance
A Kubernetes object is a "record of intent"--once you create the object, the Kubernetes system will constantly work to ensure that object exists. By creating an object, you're effectively telling the Kubernetes system what you want your cluster's workload to look like; this is your cluster's desired state.
To work with Kubernetes objects--whether to create, modify, or delete them--you'll need to use the Kubernetes API. When you use the kubectl command-line interface, for example, the CLI makes the necessary Kubernetes API calls for you.
Kubernetes Object Management
The kubectl command-line tool supports several different ways to create and manage Kubernetes objects.
| Management technique | Operates on | Recommended environment |
|---|---|---|
| Imperative commands | Live objects | Development projects |
| Imperative object configuration | Individual files | Production projects |
| Declarative object configuration | Directories of files | Production projects |
Imperative commands
When using imperative commands, a user operates directly on live objects in a cluster. The user provides operations to the kubectl command as arguments or flags.
This is the simplest way to get started or to run a one-off task in a cluster. Because this technique operates directly on live objects, it provides no history of previous configurations.
Example: Run an instance of the nginx container by creating a Deployment object:
Imperative object configuration
In imperative object configuration, the kubectl command specifies the operation (create, replace, etc.), optional flags and at least one file name. The file specified must contain a full definition of the object in YAML or JSON format.
Example: Create the objects defined in a configuration file:
kubectl create -f nginx.yaml
kubectl delete -f nginx.yaml -f redis.yaml
kubectl replace -f nginx.yaml
Declarative object configuration
When using declarative object configuration, a user operates on object configuration files stored locally, however the user does not define the operations to be taken on the files. Create, update, and delete operations are automatically detected per-object by kubectl. This enables working on directories, where different operations might be needed for different objects.
Example: Process all object configuration files in the configs directory, and create or patch the live objects. You can first diff to see what changes are going to be made, and then apply:
kubectl diff -f configs/
kubectl apply -f configs/
# Recursively process directories:
kubectl diff -R -f configs/
kubectl apply -R -f configs/
Object Spec and Status
Every Kubernetes object includes two nested object fields that govern the object’s configuration:
Spec
The spec, which you must provide, describes your desired state for the object–the characteristics that you want the object to have.
Status
The status describes the actual state of the object, and is supplied and updated by the Kubernetes system.
At any given time, the Kubernetes Control Plane actively manages an object’s actual state to match the desired state you supplied.
For example: in Kubernetes, a Deployment is an object that can represent an application running on your cluster. When you create the Deployment, you might set the Deployment spec to specify that you want three replicas of the application to be running. The Kubernetes system reads the Deployment spec and starts three instances of your desired application--updating the status to match your spec. If any of those instances should fail (a status change), the Kubernetes system responds to the difference between spec and status by making a correction--in this case, starting a replacement instance:
apiVersion: apps/v1
kind: Deployment
metadata:
   name: nginx-deployment
spec:
   selector:
      matchLabels:
         app: nginx
   replicas: 3
   ...
Object Required Fields
In the .yaml file for the Kubernetes object you want to create, you'll need to set values for the following fields:
- apiVersion - Which version of the Kubernetes API you're using to create this object
- kind - What kind of object you want to create
- metadata - Data that helps uniquely identify the object, including a name string, UID, and optional namespace
- spec - What state you desire for the object
The precise format of the object spec is different for every Kubernetes object, and contains nested fields specific to that object.
API versioning
To make it easier to eliminate fields or restructure resource representations, Kubernetes supports multiple API versions, each at a different API path, such as /api/v1 or /apis/rbac.authorization.k8s.io/v1alpha1.
Different API versions indicate different levels of stability and support. You can find more information about the criteria for each level in the API Changes documentation. Here's a summary of each level:
Alpha:
* The version names contain alpha (for example, v1alpha1).
* The software may contain bugs. Enabling a feature may expose bugs. A feature may be disabled by default.
* The support for a feature may be dropped at any time without notice.
* The API may change in incompatible ways in a later software release without notice.
* The software is recommended for use only in short-lived testing clusters, due to increased risk of bugs and lack of long-term support.
Beta:
* The version names contain beta (for example, v2beta3).
* The software is well tested. Enabling a feature is considered safe. Features are enabled by default.
* The support for a feature will not be dropped, though the details may change.
* The schema and/or semantics of objects may change in incompatible ways in a subsequent beta or stable release.
* The software is not recommended for production uses.
Stable: * The version name is vX where X is an integer. * The stable versions of features appear in released software for many subsequent versions
API groups
API groups make it easier to extend the Kubernetes API. The API group is specified in a REST path and in the apiVersion field of a serialized object.
There are several API groups in Kubernetes:
- The core group is found at REST path
/api/v1. The core group is not specified as part of the apiVersion field, for example, apiVersion:v1. - The named groups are at REST path
/apis/$GROUP_NAME/$VERSIONand use apiVersion:$GROUP_NAME/$VERSION(for example, apiVersion:batch/v1). You can find the full list of supported API groups in Kubernetes API reference.
The API Groups and their versions are summarized in the following table.
| Group | Version |
|---|---|
| admissionregistration.k8s.io | v1, v1beta1 |
| apiextensions.k8s.io | v1, v1beta1 |
| apiregistration.k8s.io | v1, v1beta1 |
| apps | v1 |
| authentication.k8s.io | v1, v1beta1 |
| authorization.k8s.io | v1, v1beta1 |
| autoscaling | v1, v2beta2, v2beta1 |
| batch | v1, v1beta1, v2alpha1 |
| certificates.k8s.io | v1, v1beta1 |
| coordination.k8s.io | v1, v1beta1 |
| core | v1 |
| discovery.k8s.io | v1beta1 |
| events.k8s.io | v1, v1beta1 |
| extensions | v1beta1 |
| flowcontrol.apiserver.k8s.io | v1alpha1 |
| networking.k8s.io | v1, v1beta1 |
| node.k8s.io | v1beta1, v1alpha1 |
| policy | v1beta1 |
| rbac.authorization.k8s.io | v1, v1beta1, v1alpha1 |
| scheduling.k8s.io | v1, v1beta1, v1alpha1 |
| settings.k8s.io | v1alpha1 |
| storage.k8s.io | v1, v1beta1, v1alpha1 |
Object Names and IDs
Each object in your cluster has a Name that is unique for that type of resource. Every Kubernetes object also has a UID that is unique across your whole cluster.
Example: you can only have one Pod named myapp-1234 within the same namespace, but you can have one Pod and one Deployment that are each named myapp-1234.
Names
A client-provided string that refers to an object in a resource URL, such as /api/v1/pods/some-name. Only one object of a given kind can have a given name at a time. However, if you delete the object, you can make a new object with the same name.
UIDs
A Kubernetes systems-generated string to uniquely identify objects. Every object created over the whole lifetime of a Kubernetes cluster has a distinct UID. It is intended to distinguish between historical occurrences of similar entities. Kubernetes UIDs are universally unique identifiers (also known as UUIDs). UUIDs are standardized as ISO/IEC 9834-8 and as ITU-T X.667. What's next
Namespaces
Kubernetes supports multiple virtual clusters backed by the same physical cluster. These virtual clusters are called namespaces.
Namespaces provide a scope for names. Names of resources need to be unique within a namespace, but not across namespaces. Namespaces cannot be nested inside one another and each Kubernetes resource can only be in one namespace. Namespaces are a way to divide cluster resources between multiple users (via resource quota).
It is not necessary to use multiple namespaces just to separate slightly different resources, such as different versions of the same software: use labels to distinguish resources within the same namespace.
You can get detailed information about a namespace with:
Viewing namespaces
You can list the current namespaces in a cluster using:
kubectl get namespace
NAME              STATUS   AGE
default           Active   1d
kube-node-lease   Active   1d
kube-public       Active   1d
kube-system       Active   1d
- default The default namespace for objects with no other namespace
- kube-system The namespace for objects created by the Kubernetes system
- kube-public This namespace is created automatically and is readable by all users (including those not authenticated). This namespace is mostly reserved for cluster usage, in case that some resources should be visible and readable publicly throughout the whole cluster. The public aspect of this namespace is only a convention, not a requirement.
- kube-node-lease This namespace for the lease objects associated with each node which improves the performance of the node heartbeats as the cluster scales
Creating a namespace
Create a new YAML file called my-namespace.yaml with the contents:
Then run: Alternatively, you can create namespace using below command:Deleting a namespace
Delete a namespace with
Warning: This deletes everything under the namespace!
This delete is asynchronous, so for a time you will see the namespace in the Terminating state.
Understanding namespaces and DNS
When you create a Service, it creates a corresponding DNS entry. This entry is of the form <service-name>.<namespace-name>.svc.cluster.local, which means that if a container just uses <service-name> it will resolve to the service which is local to a namespace. This is useful for using the same configuration across multiple namespaces such as Development, Staging and Production. If you want to reach across namespaces, you need to use the fully qualified domain name (FQDN)
Labels
Labels are key/value pairs that are attached to objects, such as pods. Labels are intended to be used to specify identifying attributes of objects that are meaningful and relevant to users, but do not directly imply semantics to the core system. Labels can be used to organize and to select subsets of objects. Labels can be attached to objects at creation time and subsequently added and modified at any time. Each object can have a set of key/value labels defined. Each Key must be unique for a given object.
Labels allow users, without requiring clients to store these mappings, to map their own organizational structures on system objects in a loosely coupled fashion.
Service deployments and batch processing pipelines are often multi-dimensional entities (e.g., multiple partitions or deployments, multiple release tracks, multiple tiers, multiple micro-services per tier). Management often requires cross-cutting operations, which breaks encapsulation of strictly hierarchical representations, especially rigid hierarchies determined by the infrastructure rather than by users.
Example labels: * "release" : "stable", "release" : "canary" * "environment" : "dev", "environment" : "qa", "environment" : "production" * "tier" : "frontend", "tier" : "backend", "tier" : "cache" * "partition" : "customerA", "partition" : "customerB" * "track" : "daily", "track" : "weekly"
https://kubernetes.io/docs/concepts/overview/working-with-objects/labels/
Label Selectors
Unlike names and UIDs, labels do not provide uniqueness. In general, we expect many objects to carry the same label(s).
Via a label selector, the client/user can identify a set of objects. The label selector is the core grouping primitive in Kubernetes.
The API currently supports two types of selectors:
* equality-based
* set-based
A label selector can be made of multiple requirements which are comma-separated. In the case of multiple requirements, all must be satisfied so the comma separator acts as a logical AND (&&) operator.
The semantics of empty or non-specified selectors are dependent on the context, and API types that use selectors should document the validity and meaning of them.
Equality-based
Equality- or inequality-based requirements allow filtering by label keys and values. Matching objects must satisfy all of the specified label constraints, though they may have additional labels as well. Three kinds of operators are admitted =,==,!=. The first two represent equality (and are simply synonyms), while the latter represents inequality. For example:
Set-based
Set-based label requirements allow filtering keys according to a set of values. Three kinds of operators are supported: in,notin and exists (only the key identifier). For example:
Recommended Labels
You can visualize and manage Kubernetes objects with more tools than kubectl and the dashboard. A common set of labels allows tools to work interoperably, describing objects in a common manner that all tools can understand.
In addition to supporting tooling, the recommended labels describe applications in a way that can be queried.
The metadata is organized around the concept of an application. Kubernetes is not a platform as a service (PaaS) and doesn't have or enforce a formal notion of an application. Instead, applications are informal and described with metadata. The definition of what an application contains is loose.
These are recommended labels. They make it easier to manage applications but aren't required for any core tooling.
Shared labels and annotations share a common prefix: app.kubernetes.io. Labels without a prefix are private to users. The shared prefix ensures that shared labels do not interfere with custom user labels.
| Key | Description | Example | Type |
|---|---|---|---|
app.kubernetes.io/name |
The name of the application | mysql |
string |
app.kubernetes.io/instance |
A unique name identifying the instance of an application | mysql-abcxzy |
string |
app.kubernetes.io/version |
The current version of the application (e.g., a semantic version, revision hash, etc.) | 5.7.21 |
string |
app.kubernetes.io/component |
The component within the architecture | database |
string |
app.kubernetes.io/part-of |
The name of a higher level application this one is part of | wordpress |
string |
app.kubernetes.io/managed-by |
The tool being used to manage the operation of an application | helm |
string |
Field Selectors
Field selectors let you select Kubernetes resources based on the value of one or more resource fields. Here are some examples of field selector queries:
- metadata.name=my-service
- metadata.namespace!=default
- status.phase=Pending
This kubectl command selects all Pods for which the value of the status.phase field is Running:
Field selectors are essentially resource filters. By default, no selectors/filters are applied, meaning that all resources of the specified type are selected. This makes the kubectl queries kubectl get pods and kubectl get pods --field-selector "" equivalent
Supported field selectors vary by Kubernetes resource type. All resource types support the metadata.name and metadata.namespace fields. Using unsupported field selectors produces an error.
Supported operators
You can use the =, ==, and != operators with field selectors (= and == mean the same thing). This kubectl command, for example, selects all Kubernetes Services that aren't in the default namespace:
Chained selectors
As with label and other selectors, field selectors can be chained together as a comma-separated list. This kubectl command selects all Pods for which the status.phase does not equal Running and the spec.restartPolicy field equals Always:
Annotations
You can use Kubernetes annotations to attach arbitrary non-identifying metadata to objects. Clients such as tools and libraries can retrieve this metadata.
You can use either labels or annotations to attach metadata to Kubernetes objects. Labels can be used to select objects and to find collections of objects that satisfy certain conditions. In contrast, annotations are not used to identify and select objects. The metadata in an annotation can be small or large, structured or unstructured, and can include characters not permitted by labels.
Annotations, like labels, are key/value maps:
Here are some examples of information that could be recorded in annotations:
- Fields managed by a declarative configuration layer. Attaching these fields as annotations distinguishes them from default values set by clients or servers, and from auto-generated fields and fields set by auto-sizing or auto-scaling systems.
- Build, release, or image information like timestamps, release IDs, git branch, PR numbers, image hashes, and registry address.
- Pointers to logging, monitoring, analytics, or audit repositories.
- Client library or tool information that can be used for debugging purposes: for example, name, version, and build information.
- User or tool/system provenance information, such as URLs of related objects from other ecosystem components.
- Lightweight rollout tool metadata: for example, config or checkpoints.
- Phone or pager numbers of persons responsible, or directory entries that specify where that information can be found, such as a team web site.
- Directives from the end-user to the implementations to modify behavior or engage non-standard features.
Instead of using annotations, you could store this type of information in an external database or directory, but that would make it much harder to produce shared client libraries and tools for deployment, management, introspection, and the like
Imperative to Declarative
By using --dry-run option, as soon as the command is run, the resource will be created. If we are going only to test a command, the --dry-run=client option can be used. This will not create the resource, instead, tell you whether the resource can be created and if your command is right. If we use the --dry-run=client option together with -o yaml option, then we will have the resource definition in YAML format on the screen.
Create an NGINX Pod
Create a deployment
Create a Service named nginx-service of type ClusterIP
Create a Service named nginx-service of type NodePort
Exercise
Create a pod with labels environment=staging and team=dev:
apiVersion: v1
kind: Pod
metadata:
  name: nodejs-app
  labels:
    run: nodejs-app
    environment: staging
    team: dev
spec:
  containers:
    - name: nodejs
      image: hellojs
      imagePullPolicy: IfNotPresent
      ports:
        - containerPort: 8080
Check that the labels are applied in the newly created pod:
Add a label to a pod using Kubectl: Remove a label from a pod using Kubectl: Update a label for a pod using Kubectl: