Service
Introduction
An abstract way to expose an application running on a set of Pods as a network service.
With Kubernetes you don't need to modify your application to use an unfamiliar service discovery mechanism. Kubernetes gives Pods their own IP addresses and a single DNS name for a set of Pods, and can load-balance across them. Motivation
Kubernetes Pods are created and destroyed to match the state of your cluster. Pods are nonpermanent resources. If you use a Deployment to run your app, it can create and destroy Pods dynamically.
Each Pod gets its own IP address, however in a Deployment, the set of Pods running in one moment in time could be different from the set of Pods running that application a moment later.
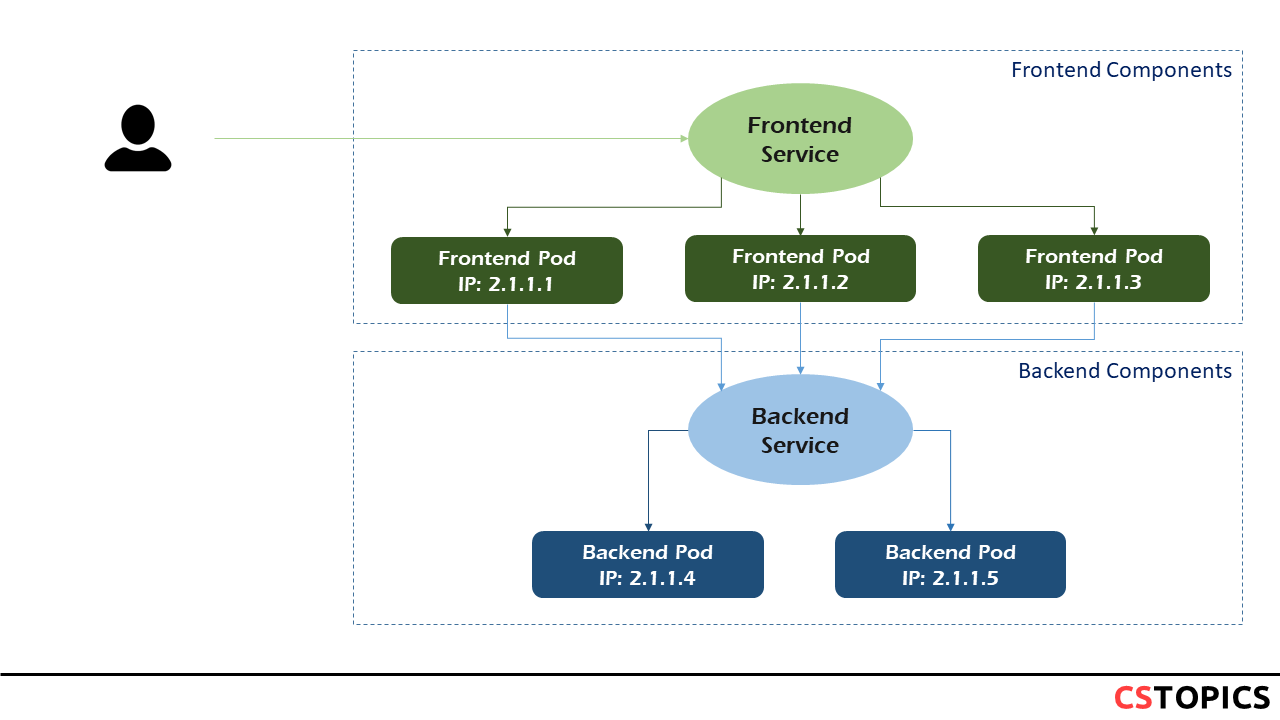
This leads to a problem: if some set of Pods (call them "backends") provides functionality to other Pods (call them "frontends") inside your cluster, how do the frontends find out and keep track of which IP address to connect to, so that the frontend can use the backend part of the workload? Enter Services.
Defining a Service
In Kubernetes, a Service is an abstraction which defines a logical set of Pods and a policy by which to access them (sometimes this pattern is called a micro-service). The set of Pods targeted by a Service is usually determined by a selector.
A Service in Kubernetes is a REST object, similar to a Pod. Like all of the REST objects, you can POST a Service definition to the API server to create a new instance. The name of a Service object must be a valid DNS label name.
For example, suppose you have a set of Pods that each listen on TCP port 9376 and carry a label app=MyApp:
apiVersion: v1
kind: Service
metadata:
  name: my-service
spec:
  selector:
    app: MyApp
  ports:
    - protocol: TCP
      port: 80
      targetPort: 9376
This specification creates a new Service object named "my-service", which targets TCP port 9376 on any Pod with the app=MyApp label.
Kubernetes assigns this Service an IP address (sometimes called the "cluster IP"), which is used by the Service proxies (see Virtual IPs and service proxies below).
The controller for the Service selector continuously scans for Pods that match its selector, and then POSTs any updates to an Endpoint object also named "my-service".
A Service can map any incoming port to a targetPort. By default and for convenience, the targetPort is set to the same value as the port field.
Port definitions in Pods have names, and you can reference these names in the targetPort attribute of a Service. This works even if there is a mixture of Pods in the Service using a single configured name, with the same network protocol available via different port numbers. This offers a lot of flexibility for deploying and evolving your Services. For example, you can change the port numbers that Pods expose in the next version of your backend software, without breaking clients.
Services without selectors
Services most commonly abstract access to Kubernetes Pods, but they can also abstract other kinds of backends. For example:
- You want to have an external database cluster in production, but in your test environment you use your own databases.
- You want to point your Service to a Service in a different Namespace or on another cluster.
- You are migrating a workload to Kubernetes. While evaluating the approach, you run only a proportion of your backends in Kubernetes.
In any of these scenarios you can define a Service without a Pod selector. For example:
apiVersion: v1
kind: Service
metadata:
  name: my-service
spec:
  ports:
    - protocol: TCP
      port: 80
      targetPort: 9376
Because this Service has no selector, the corresponding Endpoint object is not created automatically. You can manually map the Service to the network address and port where it's running, by adding an Endpoint object manually:
apiVersion: v1
kind: Endpoints
metadata:
  name: my-service
subsets:
  - addresses:
      - ip: 192.0.2.42
    ports:
      - port: 9376
The endpoint IPs must not be: loopback (127.0.0.0/8 for IPv4, ::1/128 for IPv6), or link-local (169.254.0.0/16 and 224.0.0.0/24 for IPv4, fe80::/64 for IPv6).
Endpoint IP addresses cannot be the cluster IPs of other Kubernetes Services, because kube-proxy doesn't support virtual IPs as a destination.
Service proxies
Every node in a Kubernetes cluster runs a kube-proxy. kube-proxy is responsible for implementing a form of virtual IP for Services of type other than ExternalName.
Why not use round-robin DNS?
A question that pops up every now and then is why Kubernetes relies on proxying to forward inbound traffic to backends. What about other approaches? For example, would it be possible to configure DNS records that have multiple A values (or AAAA for IPv6), and rely on round-robin name resolution? In its simplest implementation, round-robin DNS works by responding to DNS requests not only with a single potential IP address, but with a list of potential IP addresses corresponding to several servers that host identical services.
There are a few reasons for using proxying for Services:
- There is a long history of DNS implementations not respecting record TTLs, and caching the results of name lookups after they should have expired.
- Some apps do DNS lookups only once and cache the results indefinitely.
- Even if apps and libraries did proper re-resolution, the low or zero TTLs on the DNS records could impose a high load on DNS that then becomes difficult to manage
Service Types
Kubernetes ServiceTypes allow you to specify what kind of Service you want. The default is ClusterIP. Type values and their behaviors are:
- ClusterIP: Exposes the Service on a cluster-internal IP. Choosing this value makes the Service only reachable from within the cluster. This is the default ServiceType.
- NodePort: Exposes the Service on each Node’s IP at a static port (the NodePort). A ClusterIP Service, to which the NodePort Service routes, is automatically created. You’ll be able to contact the NodePort Service, from outside the cluster, by requesting
: . - LoadBalancer: Exposes the Service externally using a cloud provider’s load balancer. NodePort and ClusterIP Services, to which the external load balancer routes, are automatically created.
- ExternalName: Maps the Service to the contents of the externalName field (e.g. foo.bar.example.com), by returning a CNAME record
NodePort
If you set the type field to NodePort, the Kubernetes control plane allocates a port from a range specified by --service-node-port-range flag (default: 30000-32767). Each node proxies that port (the same port number on every Node) into your Service. Your Service reports the allocated port in its .spec.ports[*].nodePort field.
If you want to specify particular IP(s) to proxy the port, you can set the --nodeport-addresses flag in kube-proxy to particular IP block(s); this is supported since Kubernetes v1.10. This flag takes a comma-delimited list of IP blocks (e.g. 10.0.0.0/8, 192.0.2.0/25) to specify IP address ranges that kube-proxy should consider as local to this node.
For example, if you start kube-proxy with the --nodeport-addresses=127.0.0.0/8 flag, kube-proxy only selects the loopback interface for NodePort Services. The default for --nodeport-addresses is an empty list. This means that kube-proxy should consider all available network interfaces for NodePort. (That's also compatible with earlier Kubernetes releases).
If you want a specific port number, you can specify a value in the nodePort field. The control plane will either allocate you that port or report that the API transaction failed. This means that you need to take care of possible port collisions yourself. You also have to use a valid port number, one that's inside the range configured for NodePort use.
Using a NodePort gives you the freedom to set up your own load balancing solution, to configure environments that are not fully supported by Kubernetes, or even to just expose one or more nodes' IPs directly.
Note that this Service is visible as
apiVersion: v1
kind: Service
metadata:
  name: my-service
spec:
  type: NodePort
  selector:
    app: MyApp
  ports:
      # By default and for convenience, the `targetPort` is set to the same value as the `port` field.
    - port: 80
      targetPort: 80
      # Optional field
      # By default and for convenience, the Kubernetes control plane will allocate a port from a range (default: 30000-32767)
      nodePort: 30007
LoadBalancer
On cloud providers which support external load balancers, setting the type field to LoadBalancer provisions a load balancer for your Service. The actual creation of the load balancer happens asynchronously, and information about the provisioned balancer is published in the Service's .status.loadBalancer field.
Traffic from the external load balancer is directed at the backend Pods. The cloud provider decides how it is load balanced.
For LoadBalancer type of Services, when there is more than one port defined, all ports must have the same protocol and the protocol must be one of TCP, UDP, and SCTP.
Some cloud providers allow you to specify the loadBalancerIP. In those cases, the load-balancer is created with the user-specified loadBalancerIP. If the loadBalancerIP field is not specified, the loadBalancer is set up with an ephemeral IP address. If you specify a loadBalancerIP but your cloud provider does not support the feature, the loadbalancerIP field that you set is ignored.
For example:
apiVersion: v1
kind: Service
metadata:
  name: my-service
spec:
  selector:
    app: MyApp
  ports:
    - protocol: TCP
      port: 80
      targetPort: 9376
  clusterIP: 10.0.171.239
  type: LoadBalancer
status:
  loadBalancer:
    ingress:
    - ip: 192.0.2.127
ExternalName
Services of type ExternalName map a Service to a DNS name, not to a typical selector such as my-service or cassandra. You specify these Services with the spec.externalName parameter.
ExternalName accepts an IPv4 address string, but as a DNS names comprised of digits, not as an IP address. ExternalNames that resemble IPv4 addresses are not resolved by CoreDNS or ingress-nginx because ExternalName is intended to specify a canonical DNS name. To hardcode an IP address, consider using headless Services.
When looking up the host my-service.prod.svc.cluster.local, the cluster DNS Service returns a CNAME record with the value my.database.example.com. Accessing my-service works in the same way as other Services but with the crucial difference that redirection happens at the DNS level rather than via proxying or forwarding. Should you later decide to move your database into your cluster, you can start its Pods, add appropriate selectors or endpoints, and change the Service's type.
This Service definition, for example, maps the my-service Service in the prod namespace to my.database.example.com:
apiVersion: v1
kind: Service
metadata:
  name: my-service
  namespace: prod
spec:
  type: ExternalName
  externalName: my.database.example.com
Multi-Port Services
For some Services, you need to expose more than one port. Kubernetes lets you configure multiple port definitions on a Service object. When using multiple ports for a Service, you must give all of your ports names so that these are unambiguous.
As with Kubernetes names in general, names for ports must only contain lowercase alphanumeric characters and -. Port names must also start and end with an alphanumeric character. For example, the names 123-abc and web are valid, but 123_abc and -web are not.
For example:
apiVersion: v1
kind: Service
metadata:
  name: my-service
spec:
  selector:
    app: MyApp
  ports:
    - name: http
      protocol: TCP
      port: 80
      targetPort: 9376
    - name: https
      protocol: TCP
      port: 443
      targetPort: 9377
Exercise
- Create 3 pods, each with its own image e.g.: hellojs1, hellojs2 and hellojs3
- Create a service that select all these pods.
- Test the service by accessing via API proxy.
nodejs-app1.yaml
apiVersion: v1
kind: Pod
metadata:
  name: nodejs-app1
  labels:
    run: nodejs-app
spec:
  containers:
    - name: nodejs1
      image: hellojs1
      imagePullPolicy: IfNotPresent
      ports:
        - containerPort: 8080
nodejs-app2.yaml
apiVersion: v1
kind: Pod
metadata:
  name: nodejs-app2
  labels:
    run: nodejs-app
spec:
  containers:
    - name: nodejs2
      image: hellojs2
      imagePullPolicy: IfNotPresent
      ports:
        - containerPort: 8080
nodejs-app3.yaml
apiVersion: v1
kind: Pod
metadata:
  name: nodejs-app3
  labels:
    run: nodejs-app
spec:
  containers:
    - name: nodejs3
      image: hellojs3
      imagePullPolicy: IfNotPresent
      ports:
        - containerPort: 8080
nodejs-svc.yaml