Components
Cluster
When you deploy Kubernetes, you get a cluster.
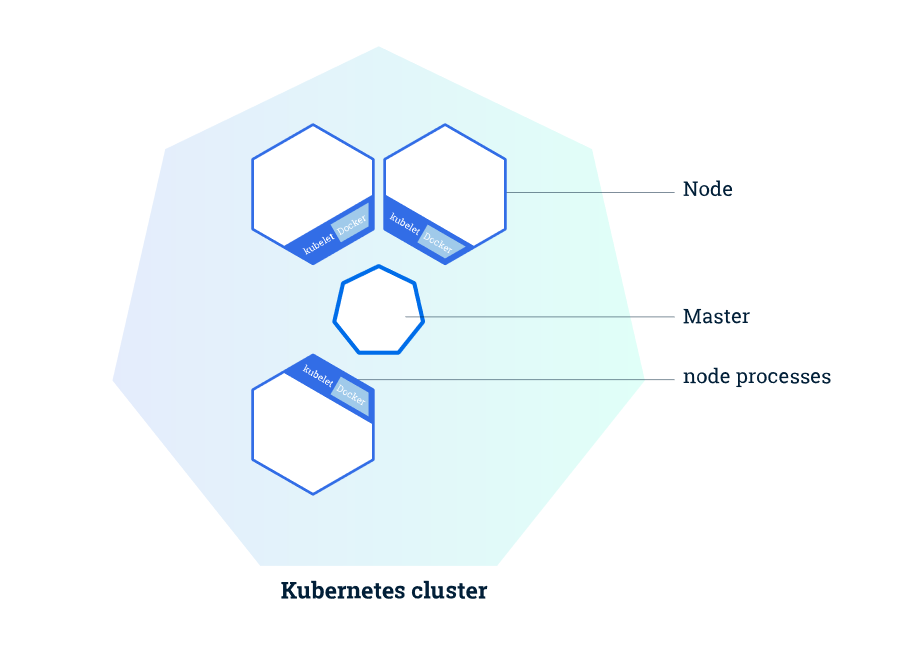
A Kubernetes cluster consists of a set of worker machines, called nodes, that run containerized applications. Every cluster has at least one worker node.
A node is a VM or a physical computer that is used as a worker machine in a Kubernetes cluster. Every node from the cluster is managed by the master.
The Master is responsible for managing the cluster. The master nodes will coordinate all the activity happening in your cluster like scheduling applications, maintaining their desired state, scaling applications and rolling new updates.
The worker node(s) host the Pods that are the components of the application workload. The control plane manages the worker nodes and the Pods in the cluster. In production environments, the control plane usually runs across multiple computers and a cluster usually runs multiple nodes, providing fault-tolerance and high availability.
Pods
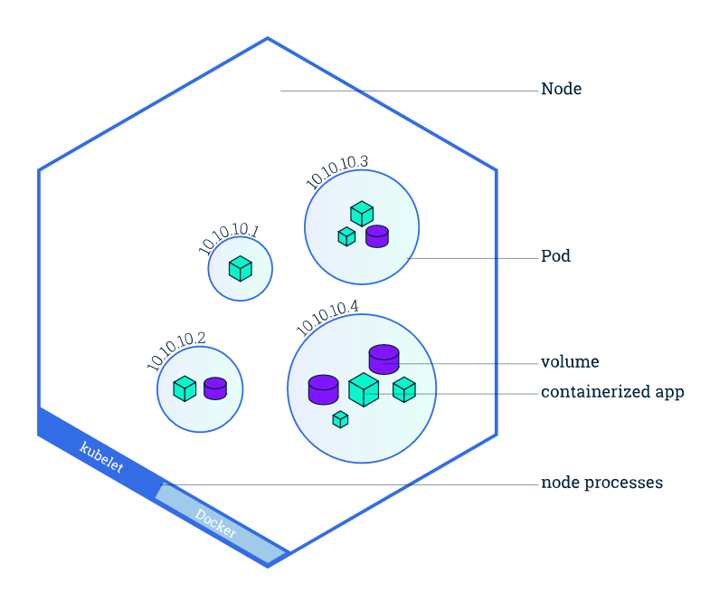
A Pod is the basic execution unit of a Kubernetes application–the smallest and simplest unit in the Kubernetes object model that you create or deploy. A Pod encapsulates an application’s container (or, in some cases, multiple containers), storage resources, a unique network IP, and options that govern how the container(s) should run. Pods in a Kubernetes cluster can be used in two main ways:
- Pods that run a single container.
- Pods that run multiple containers that need to work together.
Architecture
API Server
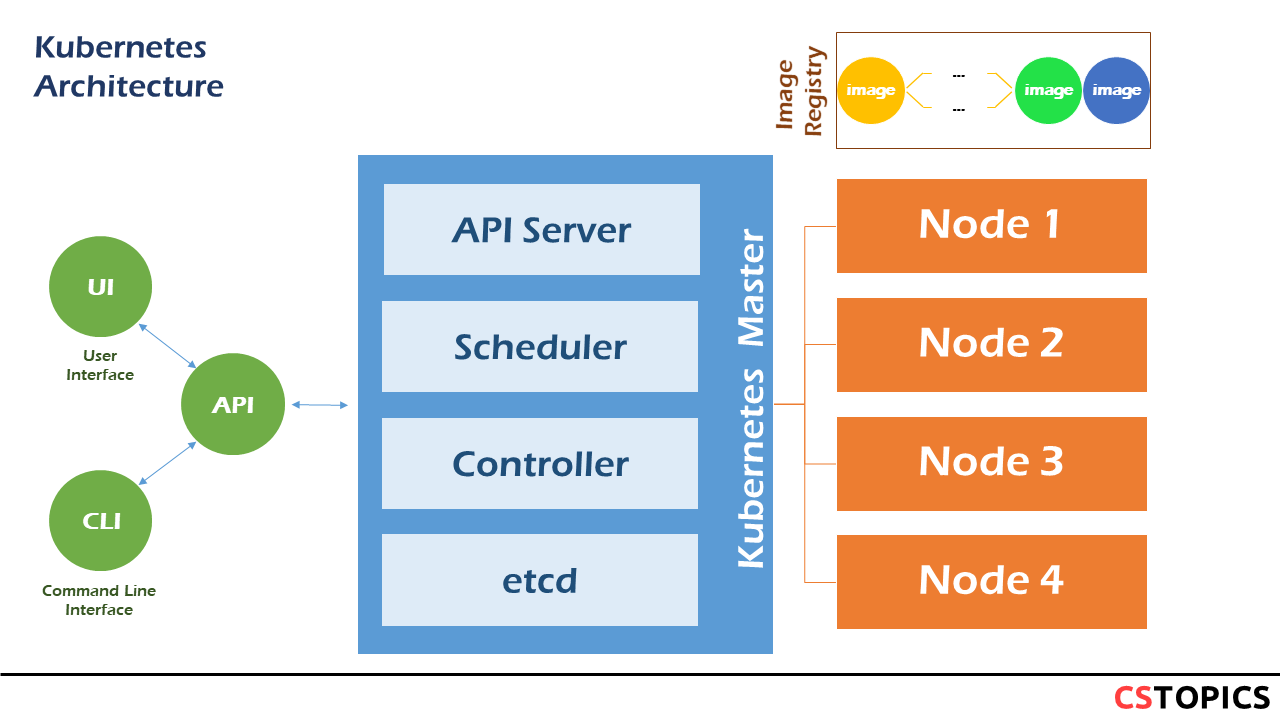
The API server is a component of the Kubernetes control plane that exposes the Kubernetes API. The API server is the front end for the Kubernetes control plane. The main implementation of a Kubernetes API server is kube-apiserver. kube-apiserver is designed to scale horizontally—that is, it scales by deploying more instances. You can run several instances of kube-apiserver and balance traffic between those instances.
Scheduler
Control plane component that watches for newly created Pods with no assigned node, and selects a node for them to run on. Factors taken into account for scheduling decisions include: individual and collective resource requirements, hardware/software/policy constraints, affinity and anti-affinity specifications, data locality, inter-workload interference, and deadlines.
Controller
Logically, each controller is a separate process, but to reduce complexity, they are all compiled into a single binary and run in a single process.
- Node controller: Responsible for noticing and responding when nodes go down.
- Replication controller: Responsible for maintaining the correct number of pods for every replication controller object in the system.
- Endpoints controller: Populates the Endpoints object (that is, joins Services & Pods).
- Service Account & Token controllers: Create default accounts and API access tokens for new namespaces.
etcd
Consistent and highly-available key value store used as Kubernetes' backing store for all cluster data. If your Kubernetes cluster uses etcd as its backing store, make sure you have a back up plan for those data.
Node components
kubelet
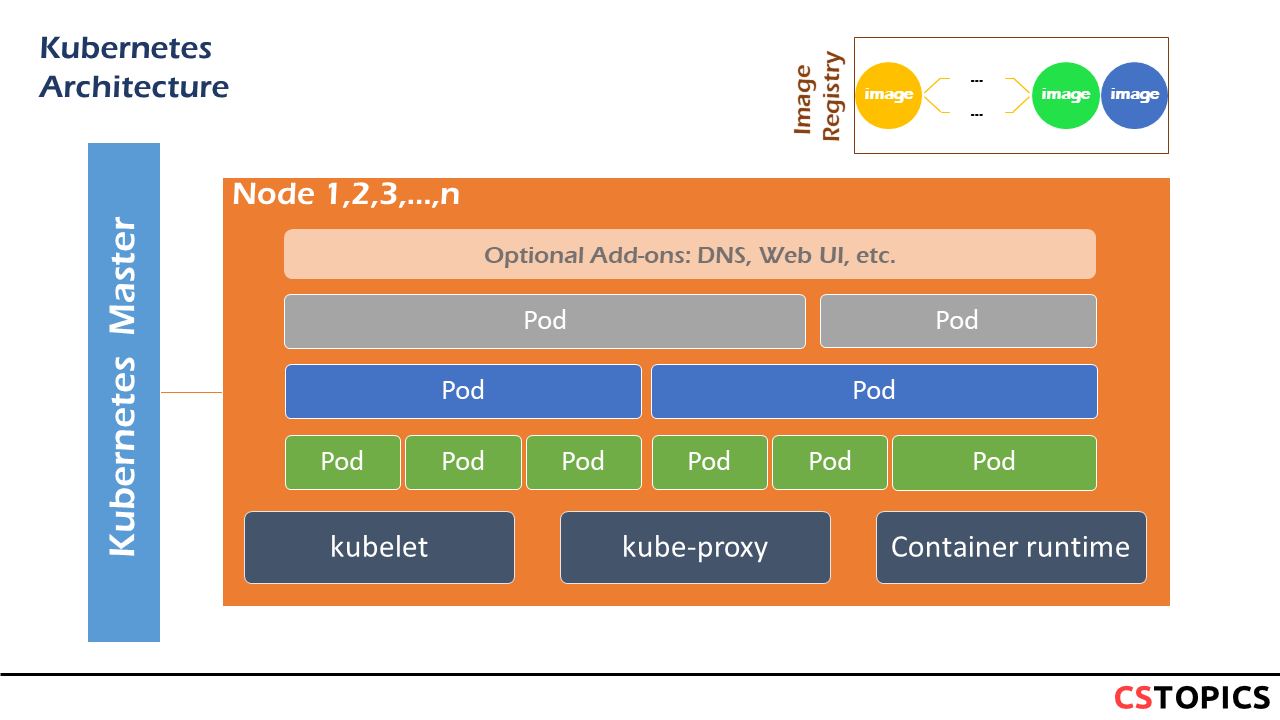
An agent that runs on each node in the cluster. It makes sure that containers are running in a Pod. The kubelet takes a set of PodSpecs that are provided through various mechanisms and ensures that the containers described in those PodSpecs are running and healthy. The kubelet doesn't manage containers which were not created by Kubernetes.
kube-proxy
kube-proxy is a network proxy that runs on each node in your cluster, implementing part of the Kubernetes Service concept. kube-proxy maintains network rules on nodes. These network rules allow network communication to your Pods from network sessions inside or outside of your cluster. kube-proxy uses the operating system packet filtering layer if there is one and it's available. Otherwise, kube-proxy forwards the traffic itself.
Container runtime
The container runtime is the software that is responsible for running containers. Kubernetes supports several container runtimes: Docker, containerd, CRI-O, and any implementation of the Kubernetes CRI (Container Runtime Interface). Addons
Addons
Addons use Kubernetes resources (DaemonSet, Deployment, etc) to implement cluster features. Because these are providing cluster-level features, namespaced resources for addons belong within the kube-system namespace.
DNS
While the other addons are not strictly required, all Kubernetes clusters should have cluster DNS, as many examples rely on it. Cluster DNS is a DNS server, in addition to the other DNS server(s) in your environment, which serves DNS records for Kubernetes services. Containers started by Kubernetes automatically include this DNS server in their DNS searches.
Web UI (Dashboard)
Dashboard is a general purpose, web-based UI for Kubernetes clusters. It allows users to manage and troubleshoot applications running in the cluster, as well as the cluster itself.
Container Resource Monitoring
Container Resource Monitoring records generic time-series metrics about containers in a central database, and provides a UI for browsing that data.
Cluster-level Logging
A cluster-level logging mechanism is responsible for saving container logs to a central log store with search/browsing interface.
kubectl
Kubectl is the Kubernetes command line interface, and can do many things.
- Kubectl is the Kubernetes cli
- Kubectl provides a swiss army knife of functionality for working with Kubernetes clusters
- Kubectl may be used to deploy and manage applications on Kubernetes
- Kubectl may be used for scripting and building higher-level frameworks
kubectl has a syntax to use as follows:
* Command: refers to want you want to perform (create, delete, etc.) * Type: refers to the resource type you are performing a command against (Pod, Service, etc.) * Name: the case-sensitive name of the object. If you don’t specify a name, it is possible to get information about all of the resources your command matches (Pods, for example) * Flags: these are optional but are useful when looking for specific resources. For example, --namespace allows you to specify a particular namespace to perform an operation in.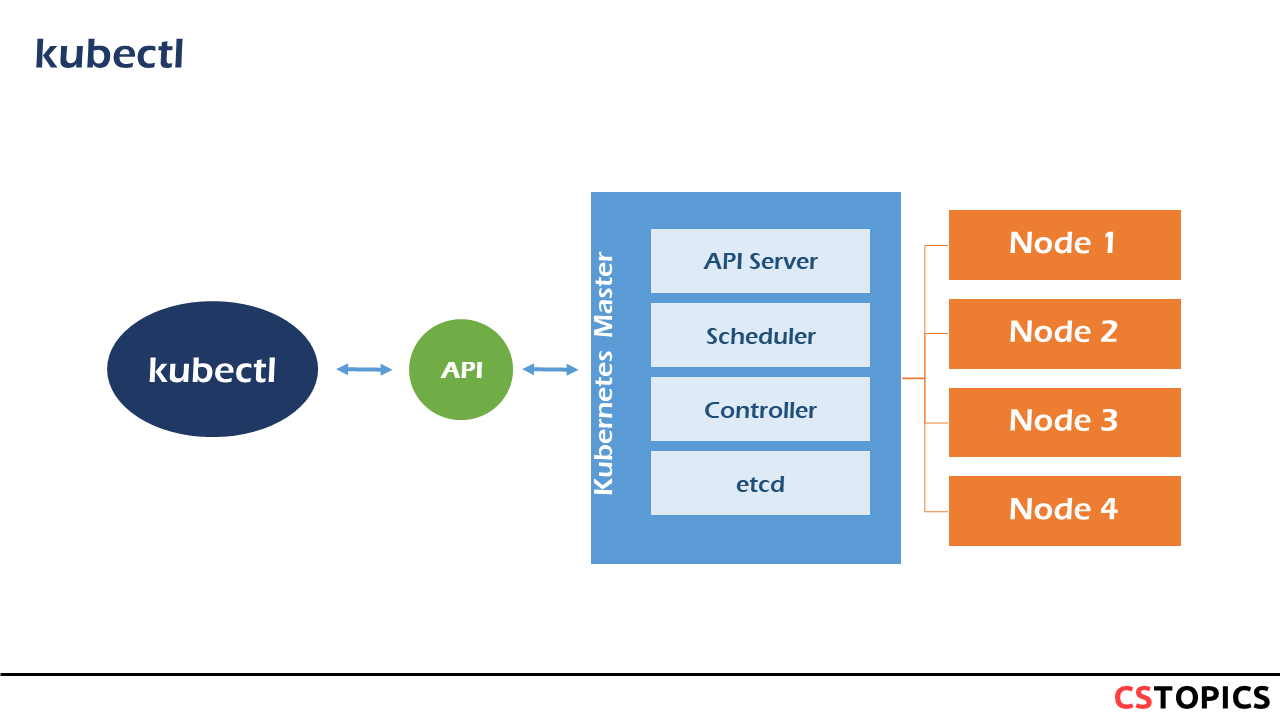
kubeadm
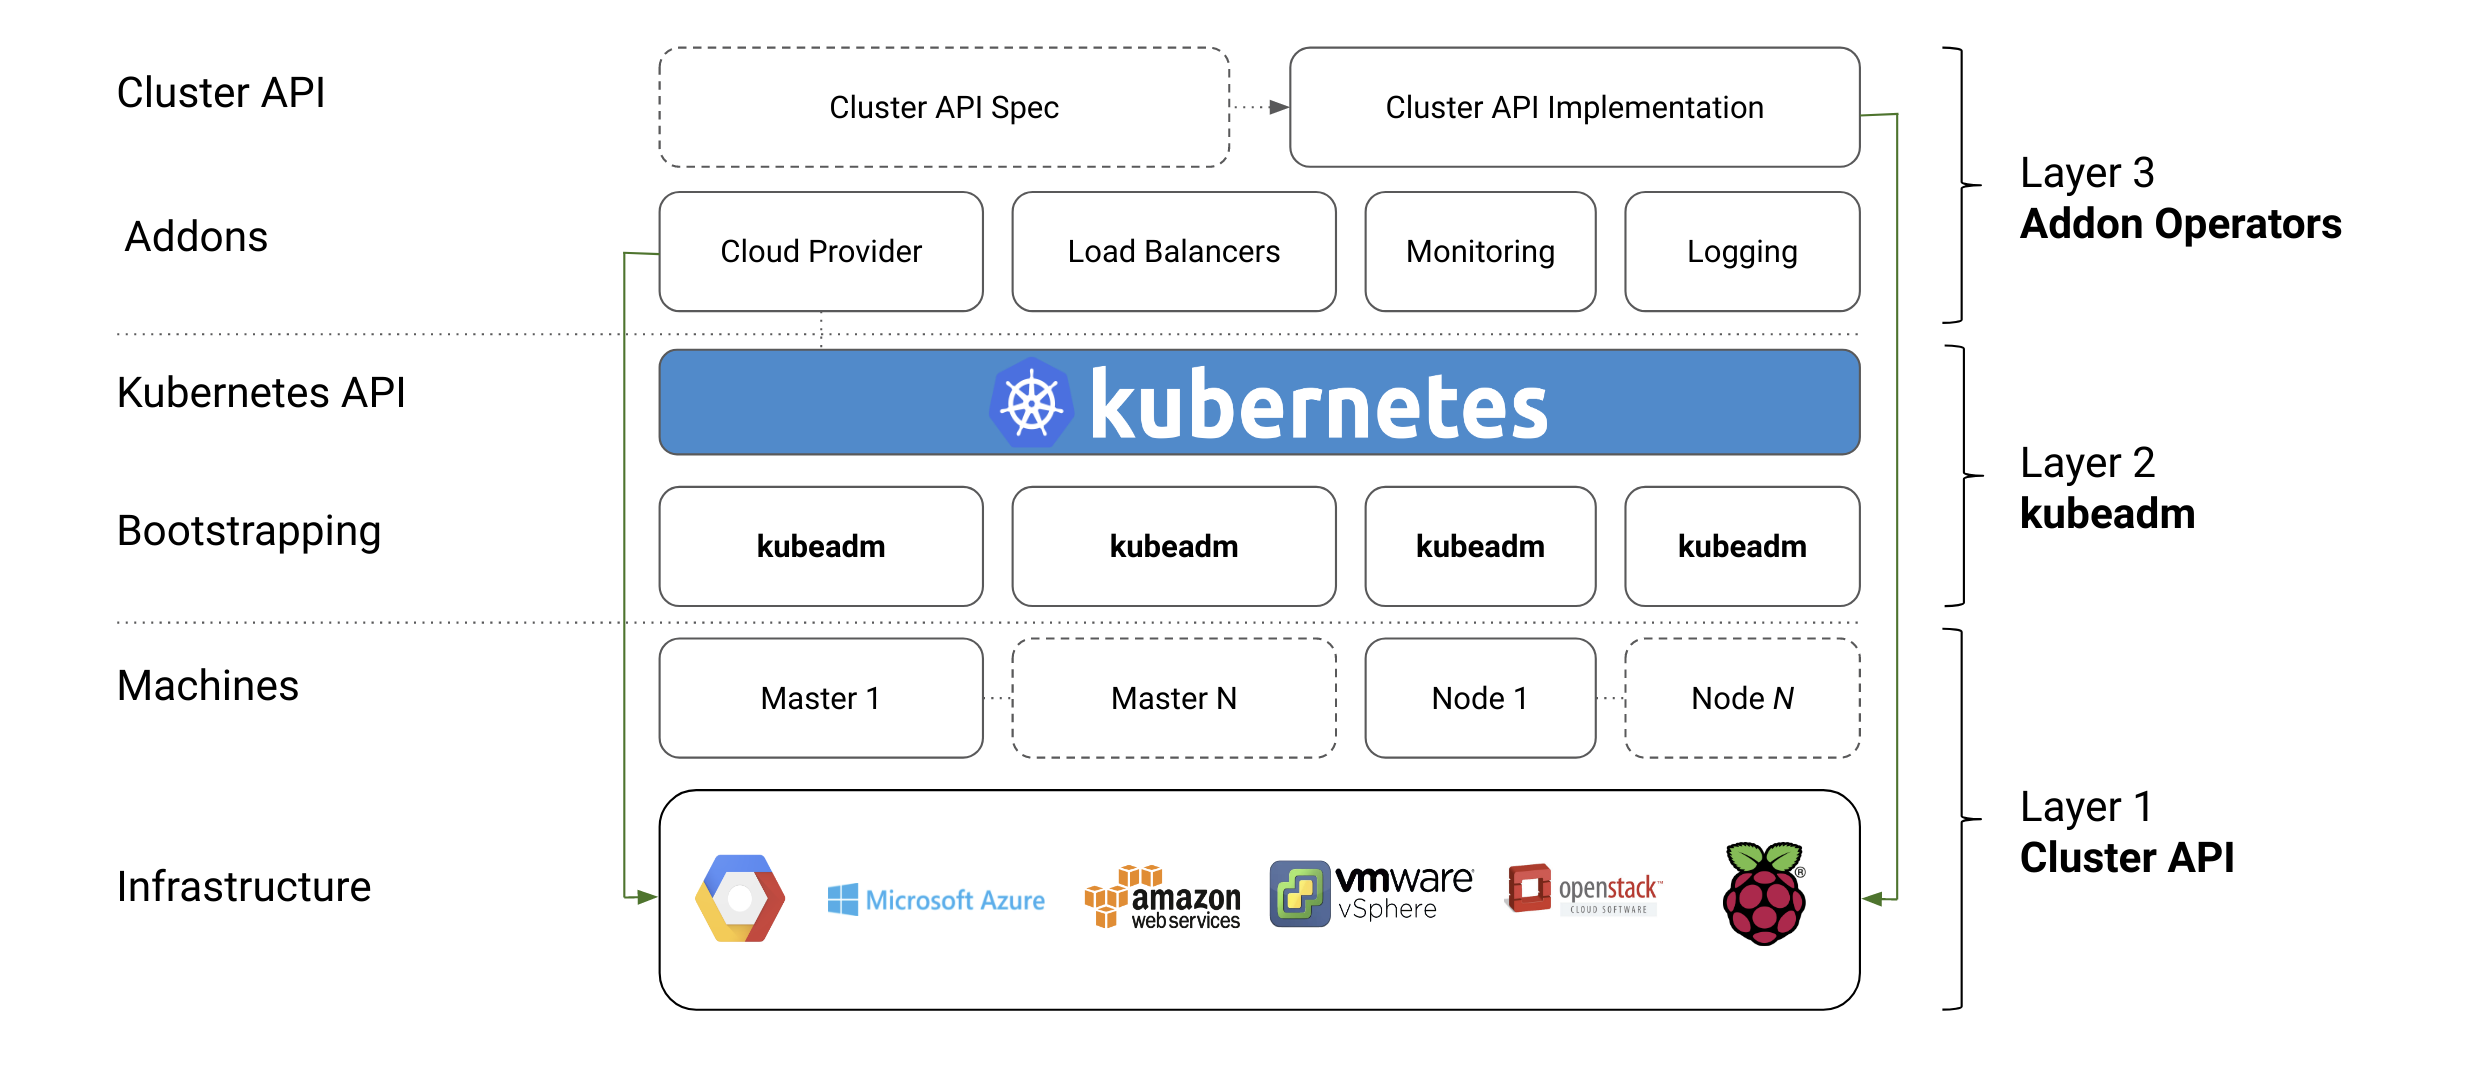
kubeadm is focused on performing the actions necessary to get a minimum viable, secure cluster up and running in a user-friendly way. kubeadm's scope is limited to the local machine’s filesystem and the Kubernetes API, and it is intended to be a composable building block for higher-level tools.
The core of the kubeadm interface is quite simple: new control plane nodes are created by you running kubeadm init, worker nodes are joined to the control plane by you running kubeadm join. Also included are common utilities for managing already bootstrapped clusters, such as control plane upgrades, token and certificate renewal.
To keep kubeadm lean, focused, and vendor/infrastructure agnostic, the following tasks are out of scope:
- Infrastructure provisioning
- Third-party networking
- Non-critical add-ons, e.g. monitoring, logging, and visualization
- Specific cloud provider integrations
Docker Desktop (Windows and Mac)
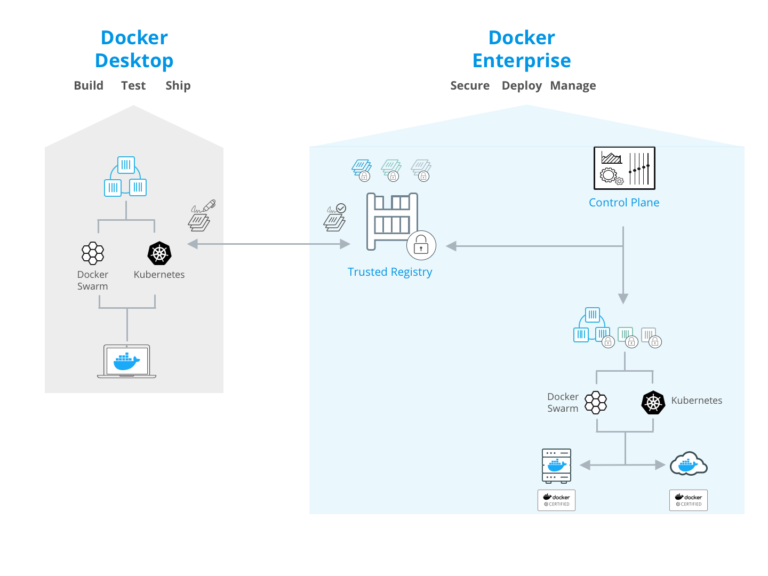
Docker Desktop is a popular way to configure a Docker dev / test environment. It eliminates the “it worked on my machine” problem because you run the same Docker containerized applications in development, test, and production environments. It exists on both Windows and Mac. It includes Kubernetes.
 |
|---|
| Source: Docker Blog |
Exercise
run the following commands.
$ kubectl version
$ kubectl cluster-info
$ kubectl get nodes
$ kubectl create deployment myhttpapp --image=katacoda/docker-http-server
$ kubectl get deployments
$ kubectl get pods -o wide
$ kubectl describe pod <pod-name>
$ kubectl get ns
$ kubectl get pods -n kube-system
$ kubectl scale deployment myhttpapp --replicas=3
$ kubectl get deployments
$ kubectl get pods -o wide
$ kubectl create ns testns
$ kubectl create deployment nshttpapp -n testns --image=katacoda/docker-http-server
$ kubectl get pods -n testns
$ kubectl delete deployment myhttpapp
$ kubectl delete deployment nshttpapp -n testns