Networking
One of the reasons why containers and services from Docker are so strong is that you can bind them together or link them to workloads outside of Docker. Containers and resources from Docker do not even have to be informed that they are deployed on Docker, or whether or not their peers are also workloads from Docker. You can use Docker to control them in a platform-agnostic way, whether your Docker hosts run Linux, Windows, or a combination of the two.
libnetwork is implemented in Go for connecting Docker containers. The aim is to provide a Container Network Model (CNM) that helps programmers provide the abstraction of network libraries. The long-term goal of libnetwork is to follow the Docker and Linux philosophy to deliver modules that work independently. libnetwork has the aim for providing a composable need for networking in containers. It also aims to modularize the networking logic in the Docker Engine and libcontainer to a single, reusable library by doing the following things:
- Replacing the networking module of the Docker Engine with libnetwork
- Allowing local and remote drivers to provide networking to containers
- Providing a dnet tool for managing and testing libnetwork-however, this is still a work in progress
Container network model can be thought of as the back bone of docker networking. It aims on keeping the networking as a library separated from container runtime rather implementing it as plugin using drivers (bridge, overlay, weave etc.)
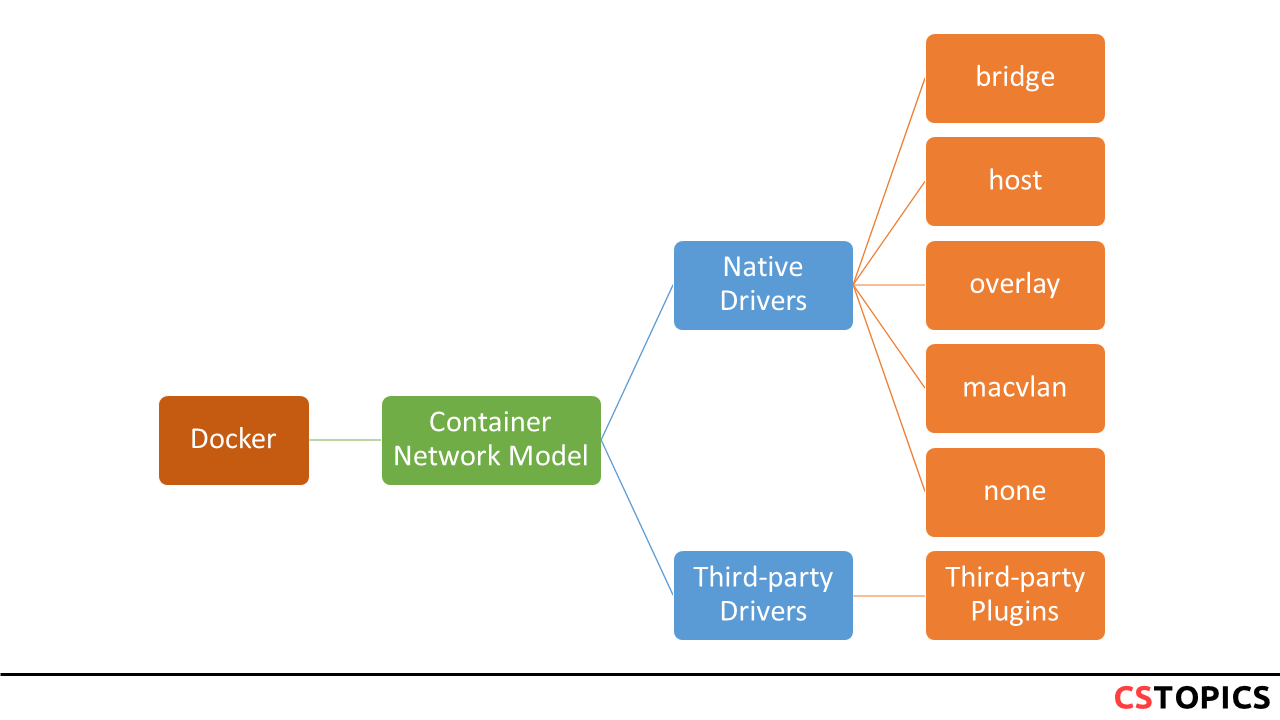
Network drivers
bridge
The default network driver. If you don’t specify a driver, this is the type of network you are creating. Bridge networks are usually used when your applications run in standalone containers that need to communicate. See bridge networks.
host
For standalone containers, remove network isolation between the container and the Docker host, and use the host’s networking directly. host is only available for swarm services on Docker 17.06 and higher. See use the host network.
overlay
Overlay networks connect multiple Docker daemons together and enable swarm services to communicate with each other. You can also use overlay networks to facilitate communication between a swarm service and a standalone container, or between two standalone containers on different Docker daemons. This strategy removes the need to do OS-level routing between these containers. See overlay networks.
macvlan
Macvlan networks allow you to assign a MAC address to a container, making it appear as a physical device on your network. The Docker daemon routes traffic to containers by their MAC addresses.
none
For this container, disable all networking. Usually used in conjunction with a custom network driver. none is not available for swarm services. See disable container networking.
Network Command
You can check the available commands for networks by using the following command:
Usage:  docker network COMMAND

Manage networks

Commands:
  connect     Connect a container to a network
  create      Create a network
  disconnect  Disconnect a container from a network
  inspect     Display detailed information on one or more networks
  ls          List networks
  prune       Remove all unused networks
  rm          Remove one or more networks

Run 'docker network COMMAND --help' for more information on a command.
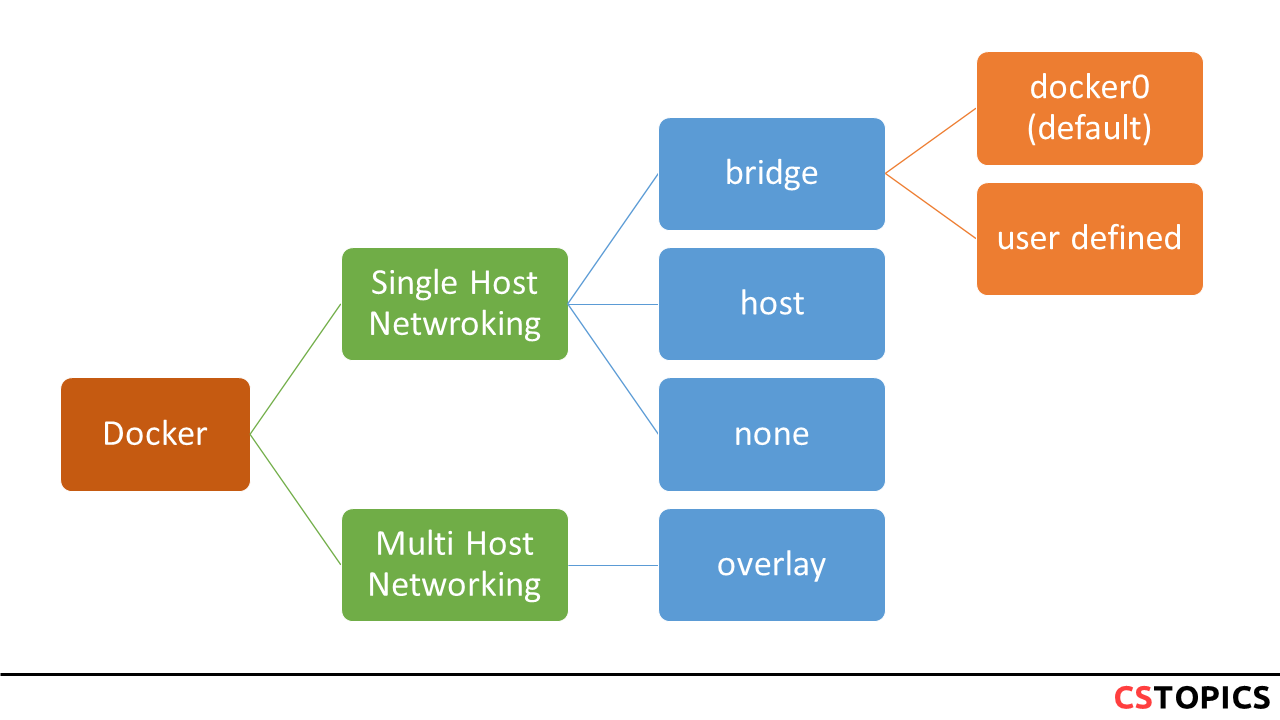
Default Networking modes
By default, there are some networking modes active. They can also be called as single-host docker networking modes. To view docker networks, you can us ls with network command.
$ docker network ls
NETWORK ID          NAME                DRIVER              SCOPE
da746b9c7cd0        bridge              bridge              local
a9bdef7cf9f7        host                host                local
846a6e76fcf0        none                null                local
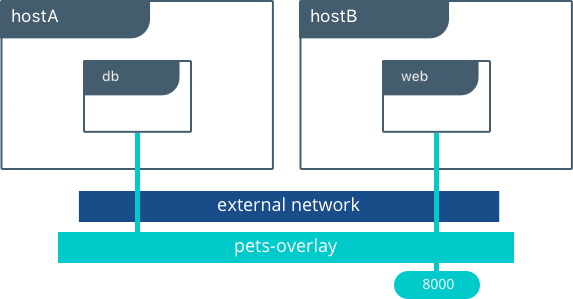
Bridge
In terms of networking, a bridge network is a Link Layer device which forwards traffic between network segments. A bridge can be a hardware device or a software device running within a host machine’s kernel.
In terms of Docker, a bridge network uses a software bridge which allows containers connected to the same bridge network to communicate, while providing isolation from containers which are not connected to that bridge network. The Docker bridge driver automatically installs rules in the host machine so that containers on different bridge networks cannot communicate directly with each other.
Bridge networks apply to containers running on the same Docker daemon host. For communication among containers running on different Docker daemon hosts, you can either manage routing at the OS level, or you can use an overlay network.
When you start Docker, a default bridge network (also called bridge) is created automatically, and newly-started containers connect to it unless otherwise specified.
You can see the information about overlay network as follows:
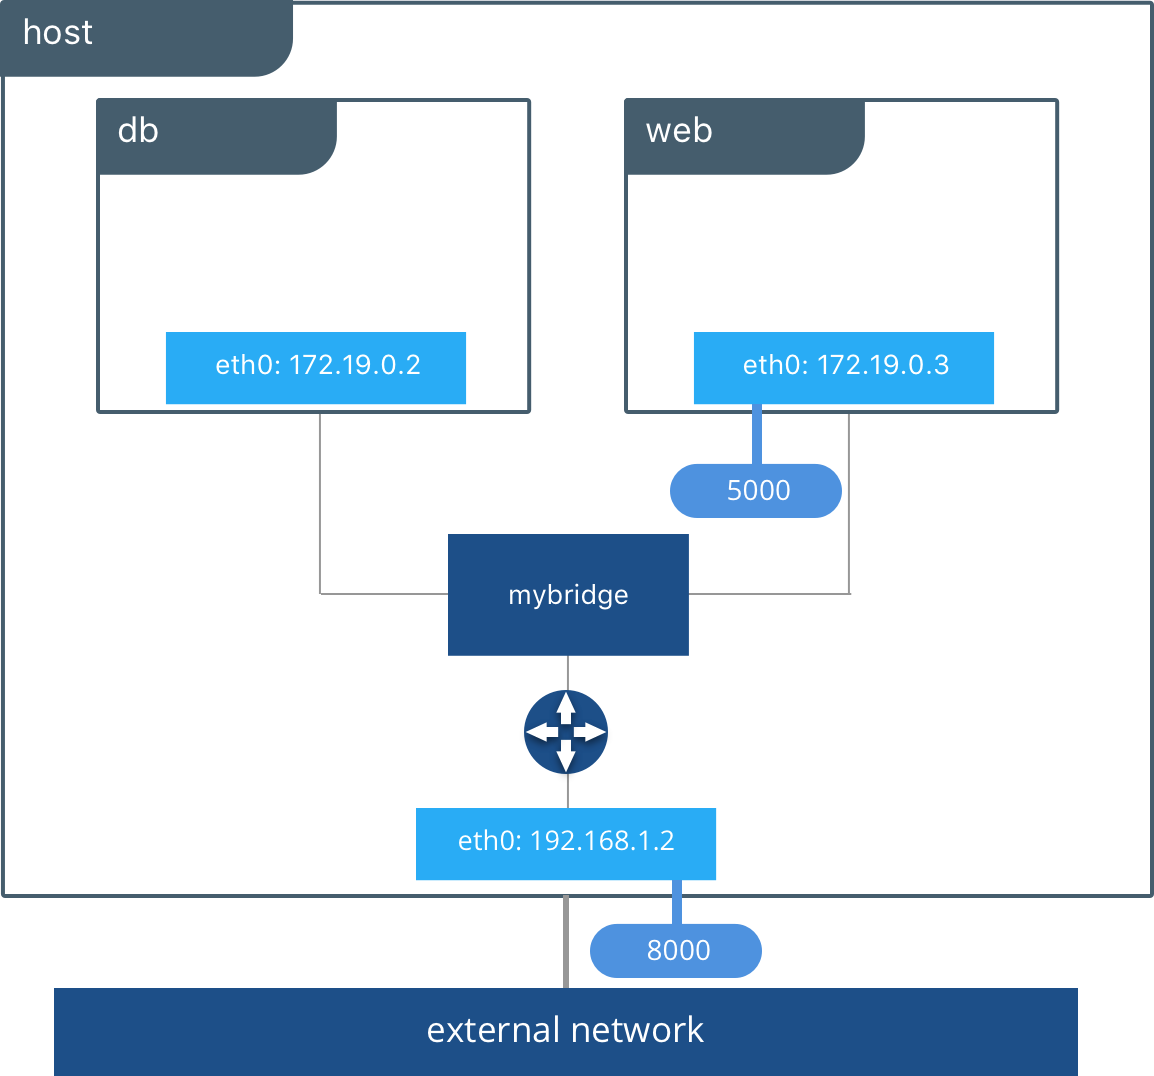
Overlay
The overlay network driver creates a distributed network among multiple Docker daemon hosts. This network sits on top of (overlays) the host-specific networks, allowing containers connected to it (including swarm service containers) to communicate securely when encryption is enabled. Docker transparently handles routing of each packet to and from the correct Docker daemon host and the correct destination container.
When you initialize a swarm or join a Docker host to an existing swarm, two new networks are created on that Docker host:
- an overlay network called ingress, which handles control and data traffic related to swarm services. When you create a swarm service and do not connect it to a user-defined overlay network, it connects to the ingress network by default.
- a bridge network called docker_gwbridge, which connects the individual Docker daemon to the other daemons participating in the swarm.
You can create user-defined overlay networks using docker network create, in the same way that you can create user-defined bridge networks. Services or containers can be connected to more than one network at a time. Services or containers can only communicate across networks they are each connected to.
You can see the information about overlay network as follows:
Host
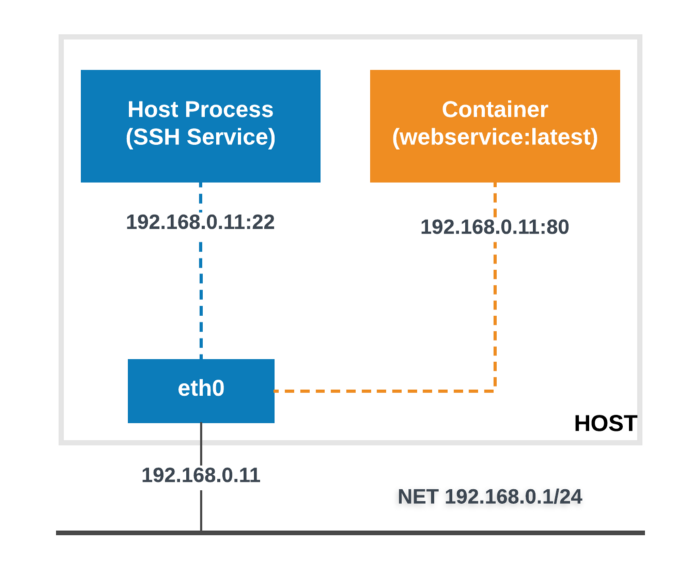
If you use the host network mode for a container, that container’s network stack is not isolated from the Docker host (the container shares the host’s networking namespace), and the container does not get its own IP-address allocated. For instance, if you run a container which binds to port 80 and you use host networking, the container’s application is available on port 80 on the host’s IP address.
Note: Given that the container does not have its own IP-address when using host mode networking, port-mapping does not take effect, and the -p, --publish, -P, and --publish-all option are ignored, producing a warning instead:
Container Networking
From the container’s point of view, it has a network interface with an IP address, a gateway, a routing table, DNS services, and other networking details (assuming the container is not using the none network driver).
Published ports
By default, when you create or run a container using docker create or docker run, it does not publish any of its ports to the outside world. To make a port available to services outside of Docker, or to Docker containers which are not connected to the container’s network, use the --publish or -p flag. This creates a firewall rule which maps a container port to a port on the Docker host to the outside world. Here are some examples. To make a port available to services outside of Docker, or to Docker containers which are not connected to the container’s network, use the --publish or -p flag. This creates a firewall rule which maps a container port to a port on the Docker host. Here are some examples.
| Flag value | Description |
|---|---|
-p 8080:80 |
Map TCP port 80 in the container to port 8080 on the Docker host. |
-p 192.168.1.100:8080:80 |
Map TCP port 80 in the container to port 8080 on the Docker host for connections to host IP 192.168.1.100. |
-p 8080:80/udp |
Map UDP port 80 in the container to port 8080 on the Docker host. |
-p 8080:80/tcp -p 8080:80/udp |
Map TCP port 80 in the container to TCP port 8080 on the Docker host, and map UDP port 80 in the container to UDP port 8080 on the Docker host. |
DNS services
By default, a container inherits the DNS settings of the host, as defined in the /etc/resolv.conf configuration file. Containers that use the default bridge network get a copy of this file, whereas containers that use a custom network use Docker’s embedded DNS server, which forwards external DNS lookups to the DNS servers configured on the host.
Custom hosts defined in /etc/hosts are not inherited. To pass additional hosts into your container, refer to add entries to container hosts file in the docker run reference documentation. You can override these settings on a per-container basis.
| Flag | Description |
|---|---|
--dns |
The IP address of a DNS server. To specify multiple DNS servers, use multiple --dns flags. If the container cannot reach any of the IP addresses you specify, Google’s public DNS server 8.8.8.8 is added, so that your container can resolve internet domains. |
--dns-search |
A DNS search domain to search non-fully-qualified hostnames. To specify multiple DNS search prefixes, use multiple --dns-search flags. |
--dns-opt |
A key-value pair representing a DNS option and its value. See your operating system’s documentation for resolv.conf for valid options. |
--hostname |
The hostname a container uses for itself. Defaults to the container’s ID if not specified. |
Exercise
Make a bridge network
- Create the alpine-net network. You do not need the --driver bridge flag since it’s the default, but this example shows how to specify it.
- List Docker’s networks:
- Inspect the alpine-net network. This shows you its IP address and the fact that no containers are connected to it:
- Create your four containers.
- Inspect the bridge network and the alpine-net network again: